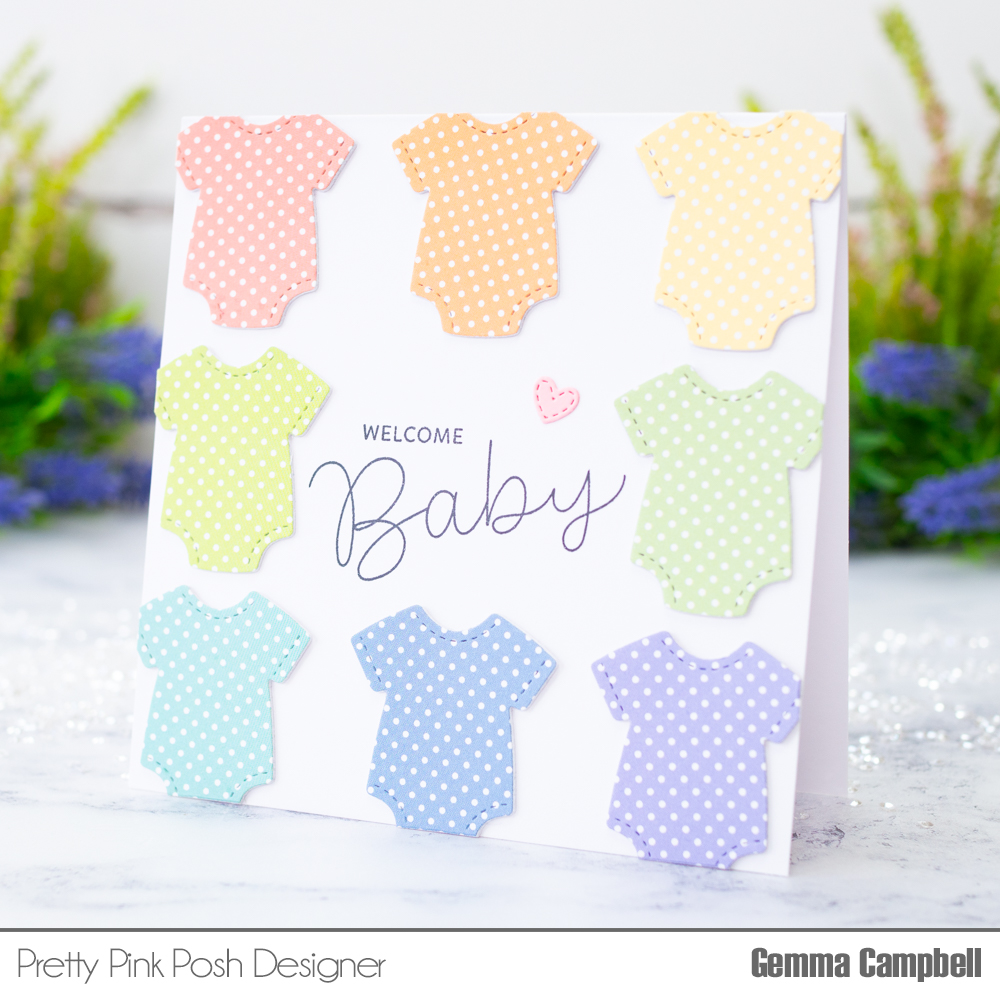
I began by die cutting the onesie die, from the Baby Mug Additions set, from a rainbow of pastel polka dot patterned paper. I love these softer colours for a baby card.
I also die cut some white card layers, adding two behind each patterned paper onesie for dimension.
Next, I stamped a sentiment from the Baby Animals stamp set in the centre of a 5.25” square card base. The large ‘baby’ sentiment has a coordinating die, which I didn’t use on this card, but I love to have that option.
I arranged the onesies around the sentiment, adhering them with liquid glue, then trimming away anything overhanging the card base.
At this point, I decided I needed something extra to fill a space above the sentiment. I picked out the small heart die from theBaby Mug Additions set, die cutting from pink card and adhering on the card to finish.
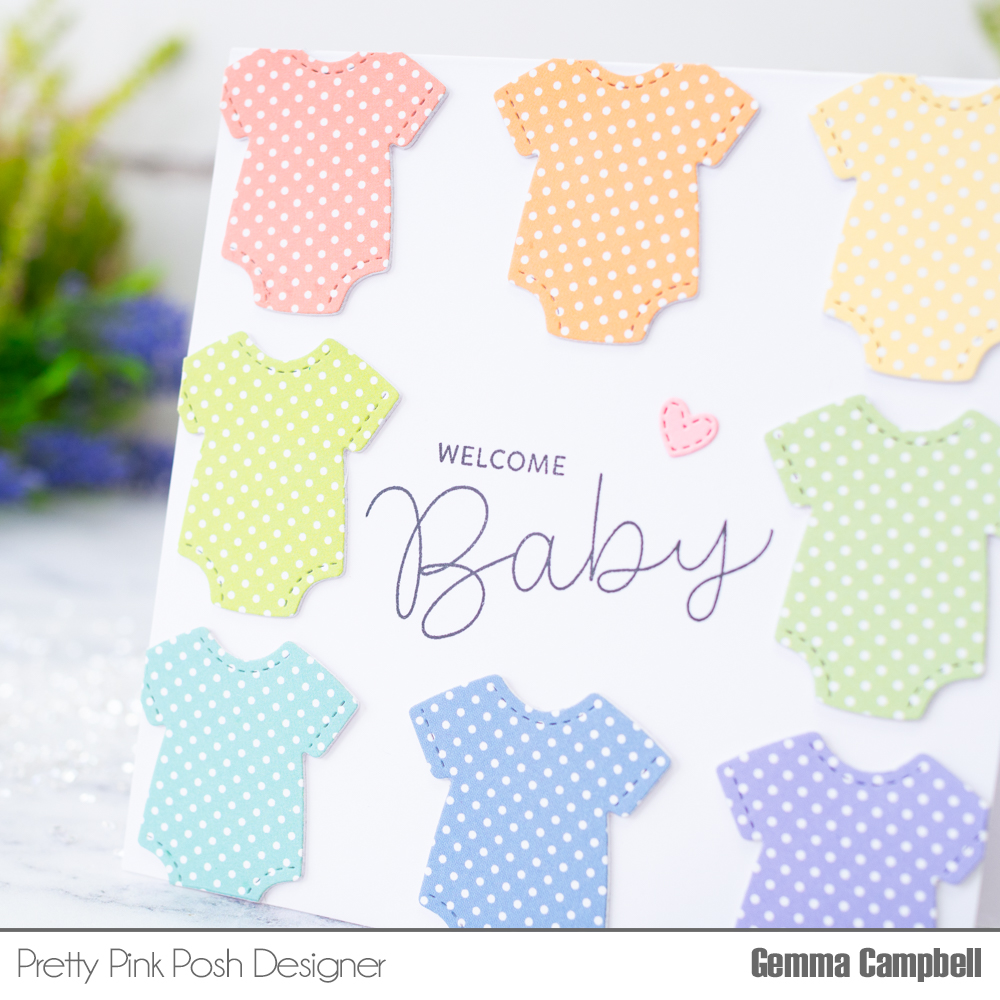
I hope that this card inspired you to bring out your patterned paper for your baby cards. Thanks for stopping by!
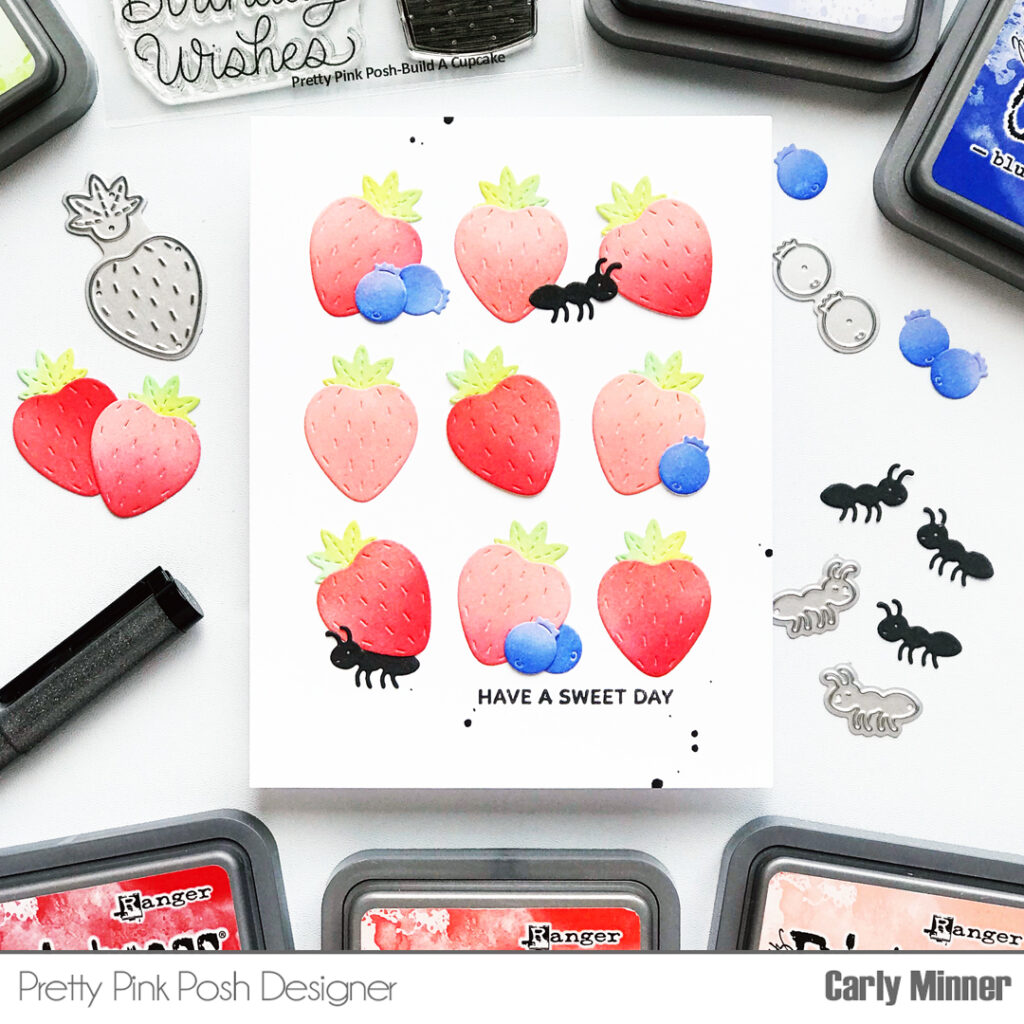
I absolutely adore cards that use a grid pattern of die cuts or stamped images but I didn’t really think it was something I could do because I hate to measure and I’m just not very precise, LOL!
BUT I’ve found that if I’m intentionally a little crooked here & there and add a few extras, I can make a really easy grid that feels precise enough! Add in a little sentiment from the Floral Hearts and Build A Cupcake sets and these cards were finished.
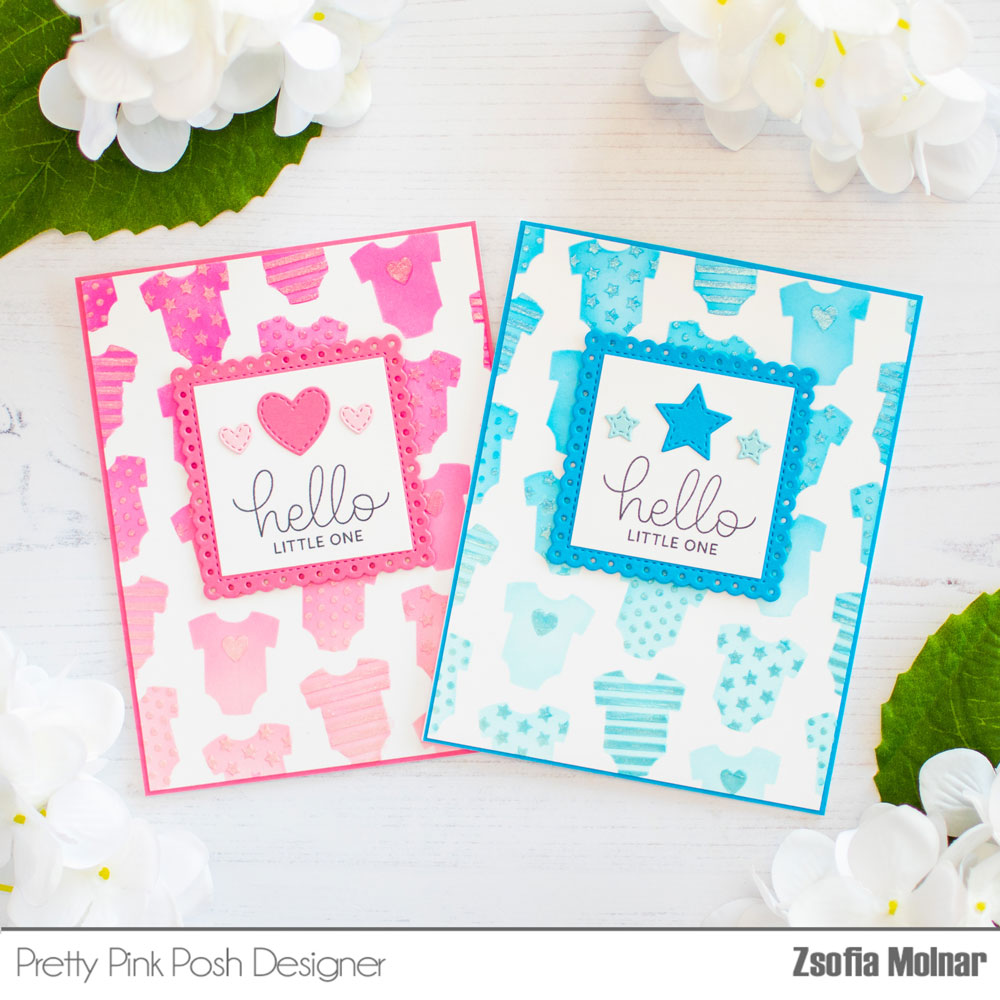
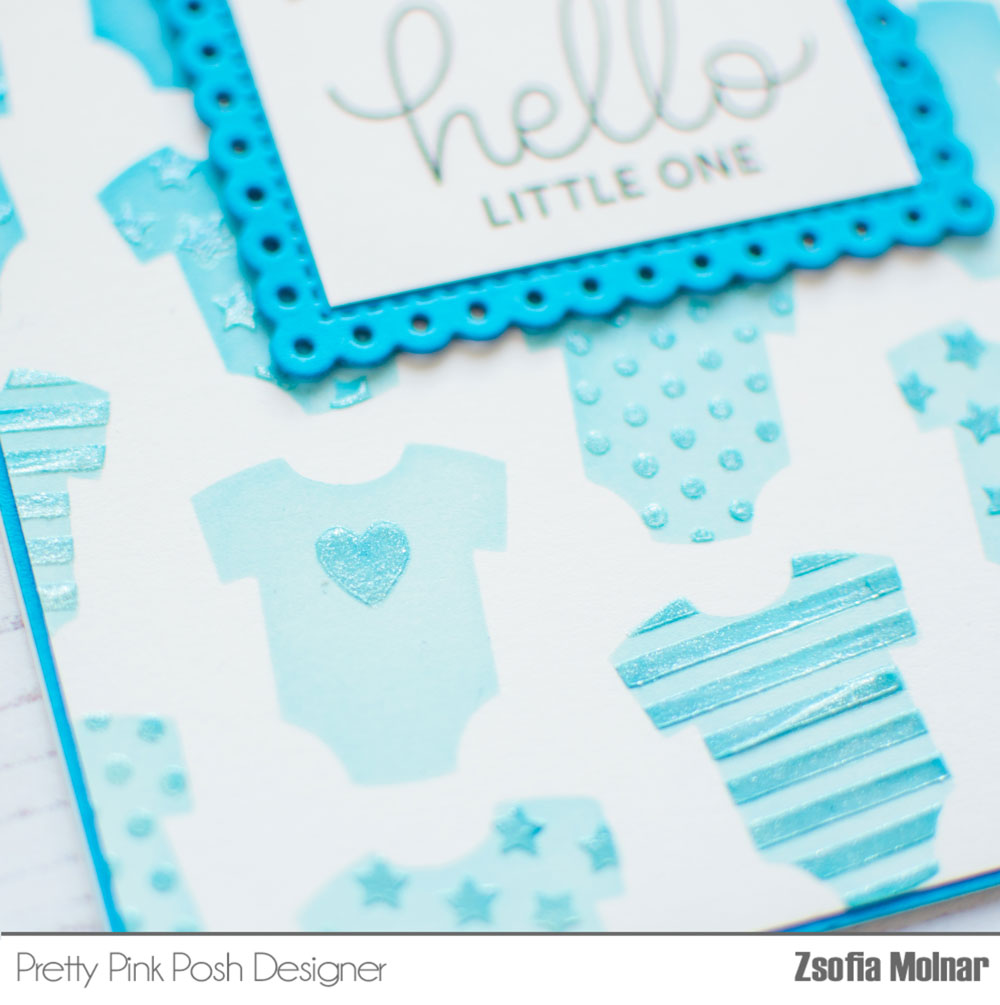
Hi friends! It’s Zsofi here today on the Pretty Pink Posh blog and I am so happy to share a project I made mixing some of the brand new products for welcoming babies on this world.
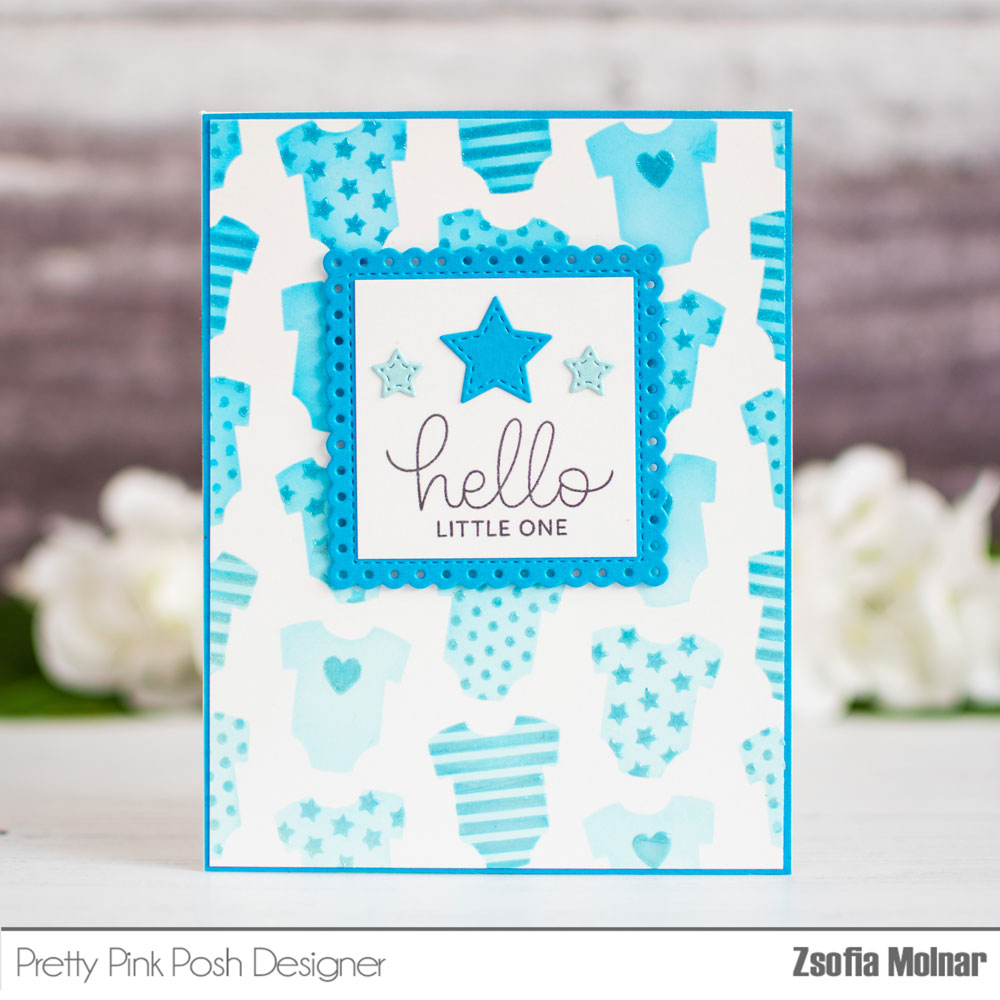
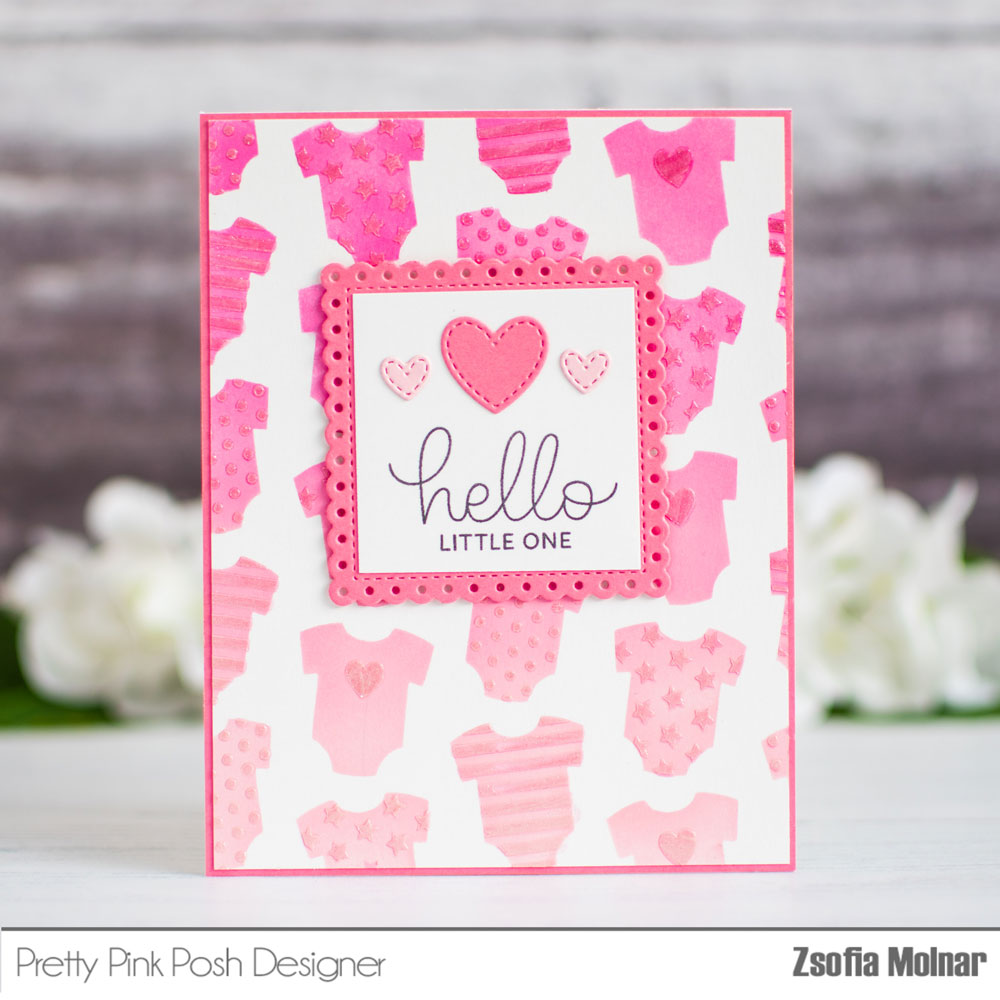
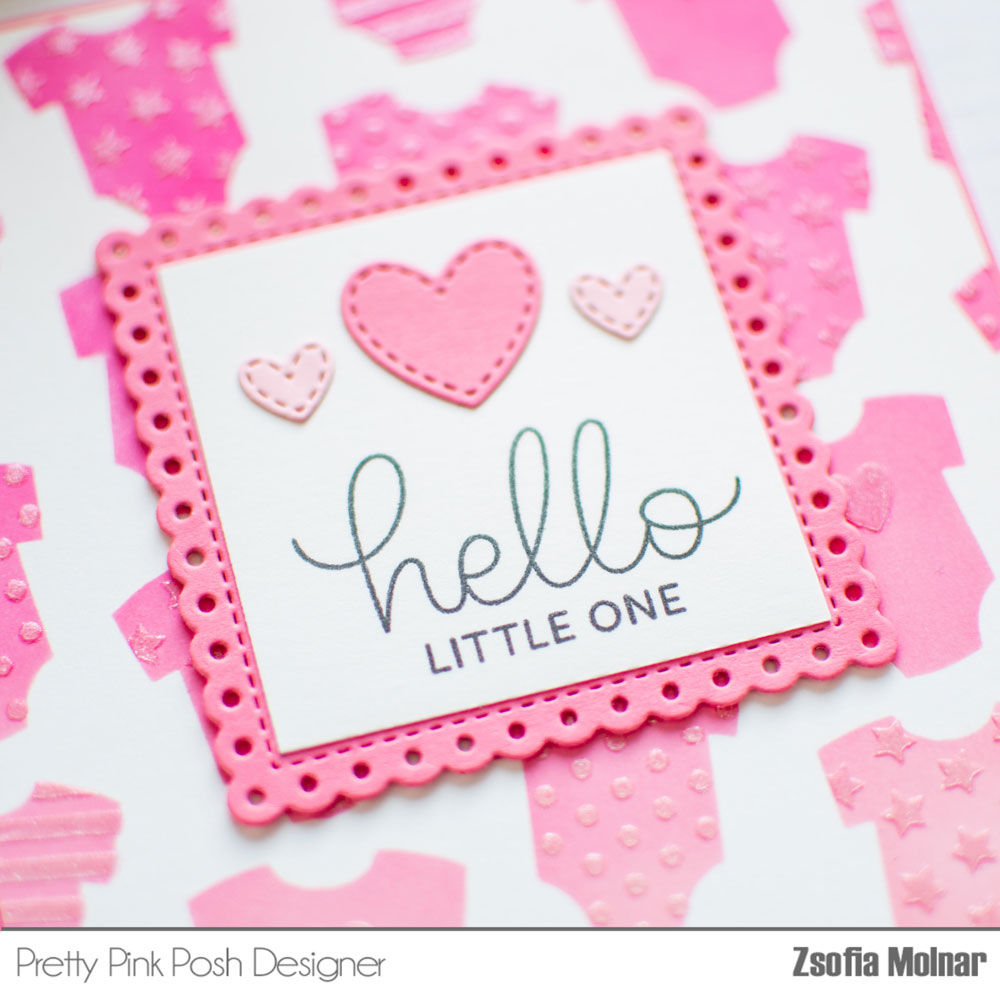
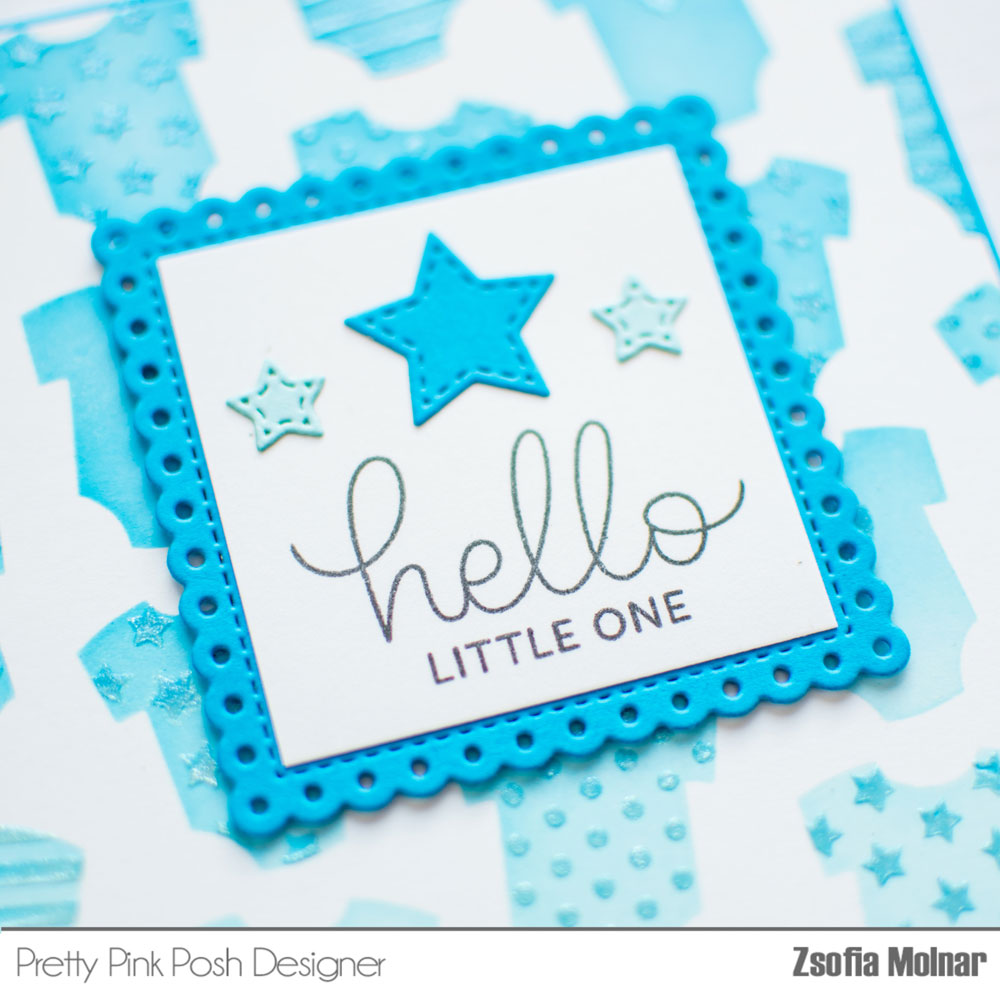
First I used the Layered Onesies stencil set on Bristol Smooth cardstock with Distress Oxide inks. For the first layer I used Kitch Flamingo / Picked Raspberry for the pink and Tumbled Glass / Salty Ocean for the blue. I was going for an ombre look, a bit lighter on the bottom and darker on the top.
For the patterns (Layer B) I used the same inks just with heavier hand and before removing the stencil, I added a gloss glitter gel (Moda Scrap). I set it aside to dry completely.
For the focal panels, I die cut a few stitched hearts and stars from coloured cardstock scraps using the Baby Mug Additions and Stacked Squares diesets. Those little elements are a perfect touch instead of a coloured image.
I stamped a sentiment from the Baby Basics stamp set on the bottom of a 2*2 inches white square and adhered the die cuts. I used a new Eyelet Squares die to give them a colourful mat.
I like to give a frame to my cards, so I cut a tiny bit off the stenciled backgrounds and gave them a mat too. I popped up the focal panels with 3D foam tape for a bit of dimension and my cards were ready. Look at the shimmery shine from the glitter paste, isn’t it gorgeous?
I hope you liked my card set and got inspired to make a couple of baby greetings like this. I cannot wait to try these in green, orange, purple and yellow too!
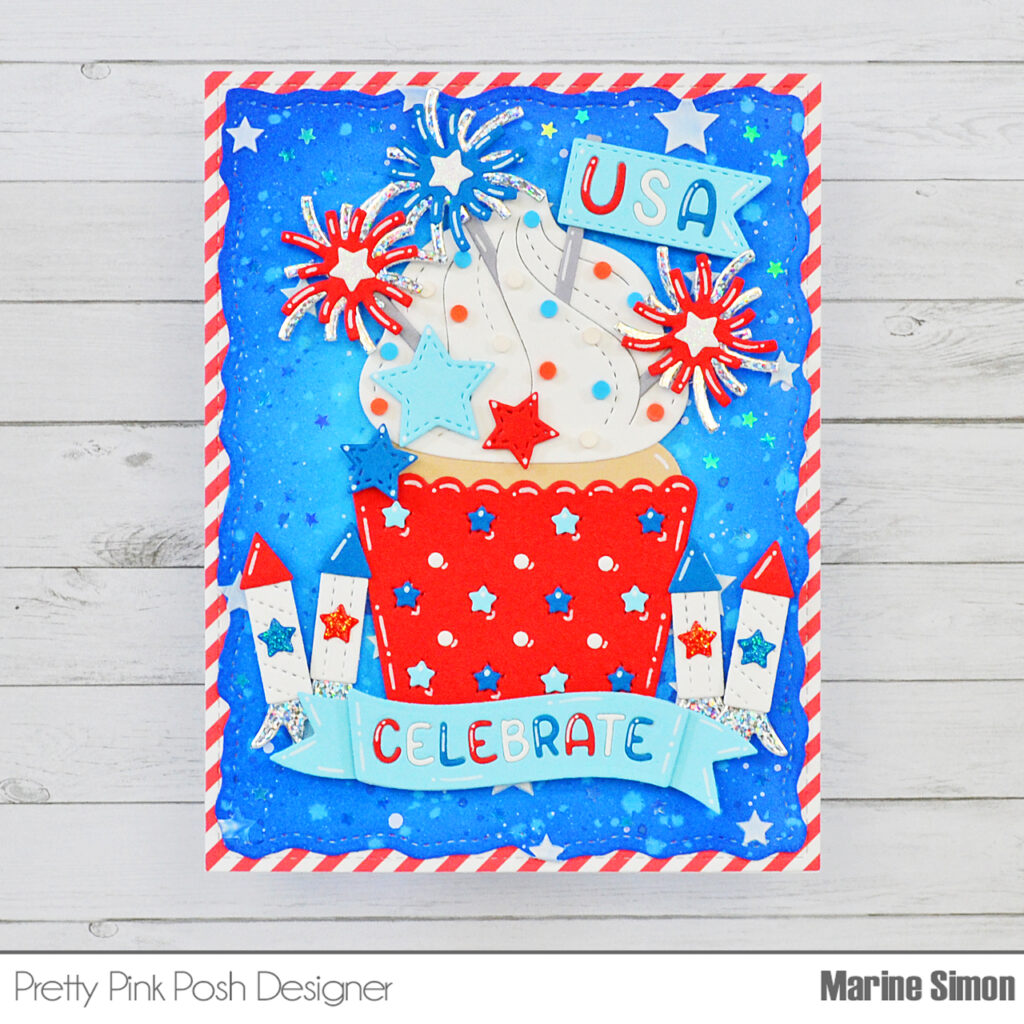
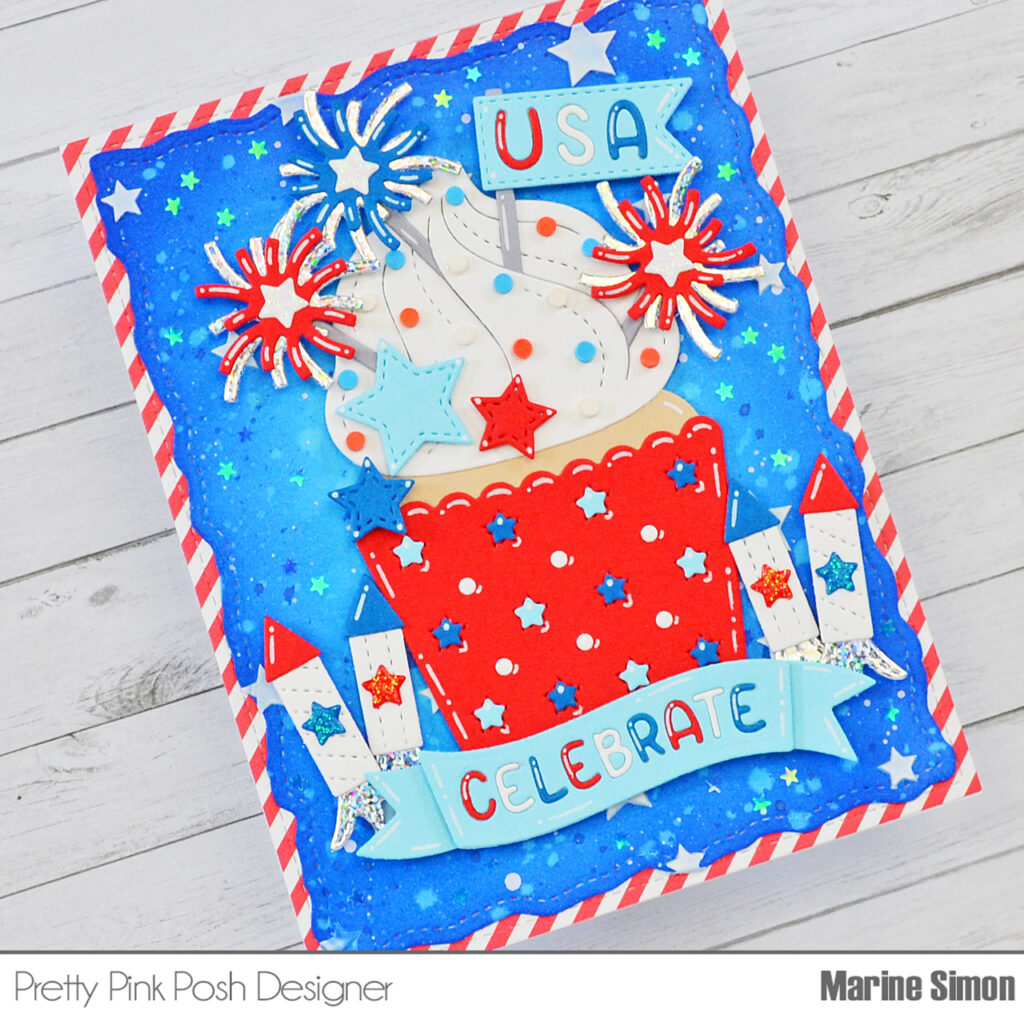
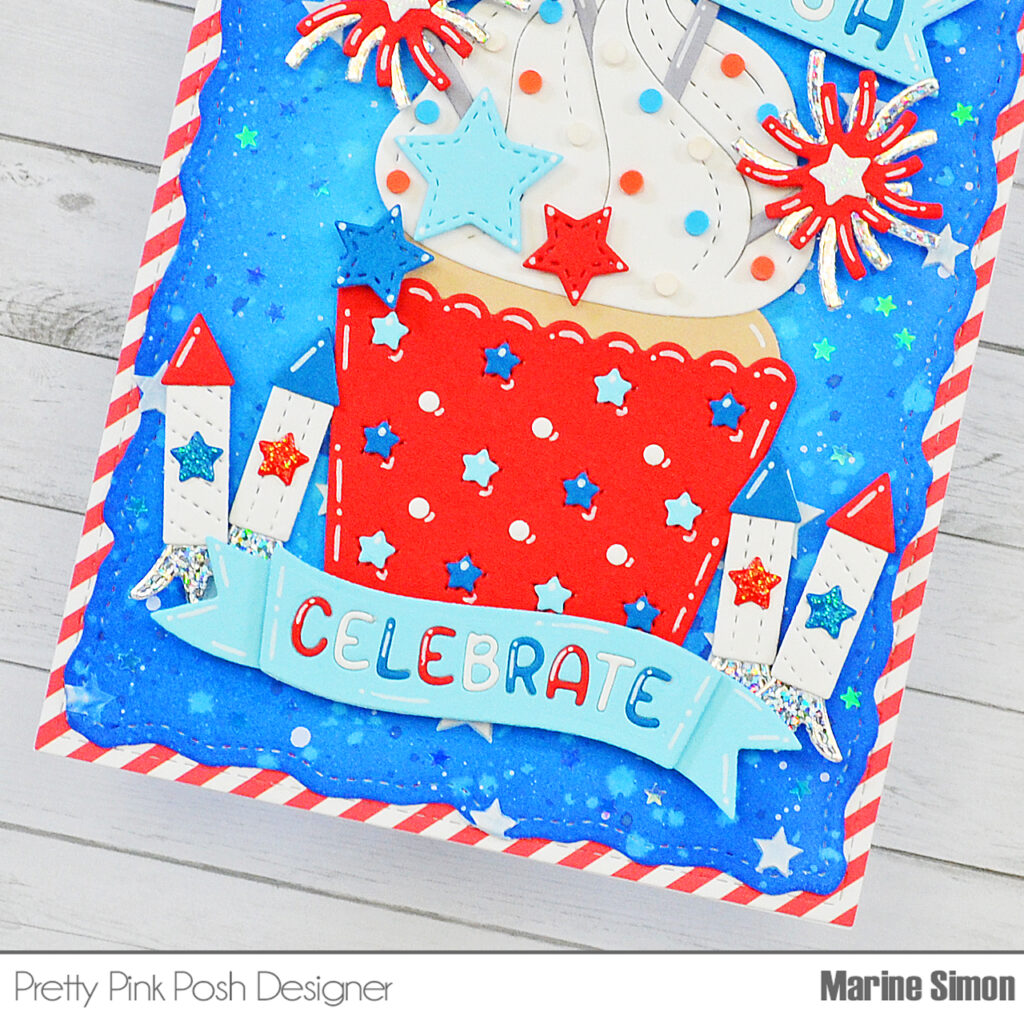
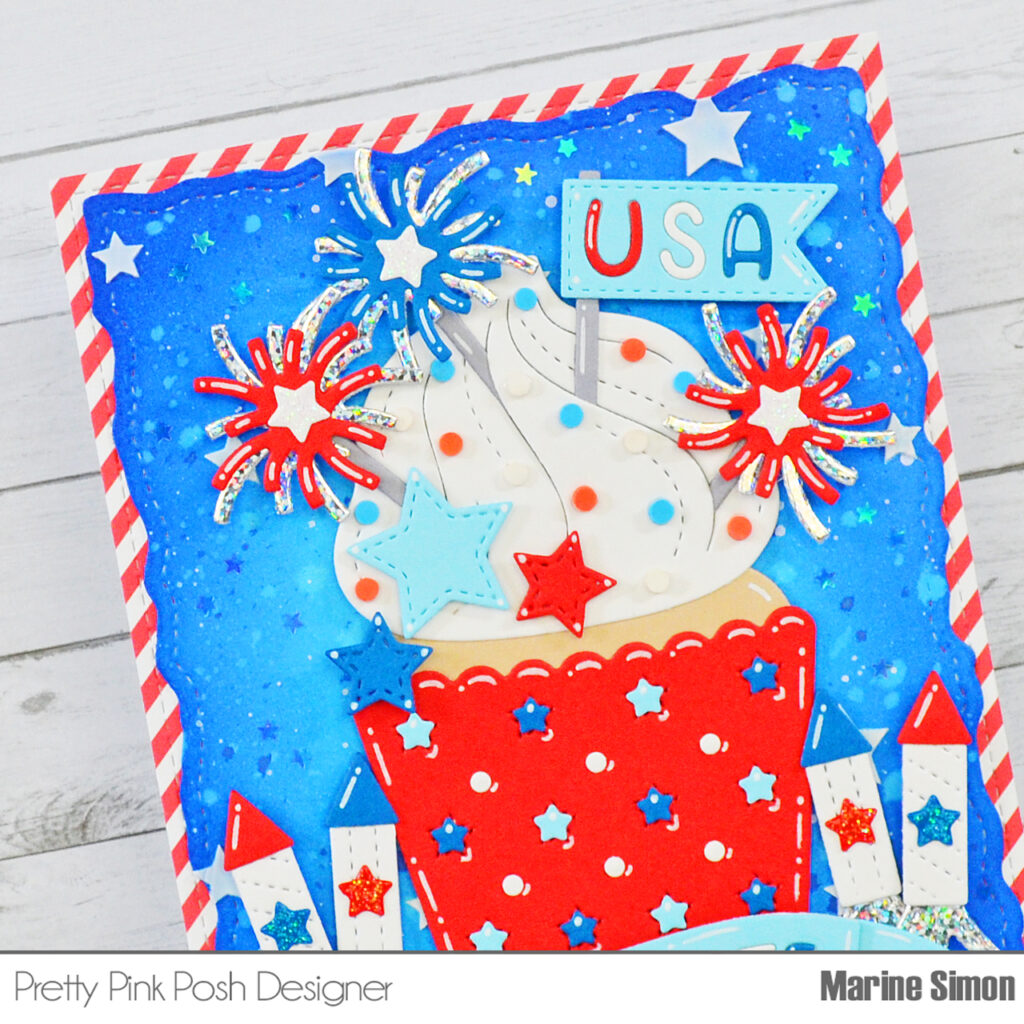
Hello crafty friends, Marine here with you today! I’m so happy to share with you this bright and bold 4th of July card showcasing the amazing Big Celebration Cupcake die set. I usually don’t make many of those cards when that time of the year comes, so I decided to go for a whole traditional red, white and blue color palette, I added holographic and sparkling details, and had the most fun!
I started off by cutting a Stitched Torn Rectangle panel out of Strathmore bristol smooth cardstock, and colored it using three shades of blue oxide inks. I first applied tumbled glass right in the center of my panel, next I added salty ocean on the edges and blended it into the tumbled glass section, and I added a little bit of prize ribbon on the edges that I blended into the salty ocean section. I splattered water on my panel, and dried it using a paper towel. I also mixed some prize ribbon oxide ink with water, used a small brush to add more splatters on my panel, and then did the same with copic opaque white ink. And finally I used the starry stencil from the Spooky Sky stencil pack along with white stenciling paste to add an extra USA touch to my panel.
Next I cut all the bits and pieces out of colored cardstock. As I was saying, I used a red, white and blue color palette to totally embrace this 4th of July theme, and added holographic details on the fireworks and rockets’ tails. And for some variation, I brought some light blue accents with the banners and stars on the cupcake wrapper. I used most of the Big Celebration Cupcake dies, as well as the cake, banner and “Celebrate” dies from Big Birthday Cupcake.
I assembled the fireworks and rockets using liquid glue, and attached everything on my panel using 1mm and 2 foam squares. Next I cut a 5,5 x 4,25 inches red and white stripe pattern paper, attached it to a white card base, and then stuck my cupcake panel on top using liquid glue again. As always I added highlights and details to my die-cut pieces using a white gel pen, and next added the last final details: a bunch of Iridescent Mini Star Confetti all around the cupcake, sprinkles on the whipped cream from the Bright Rainbow Clay Confetti pack, and white blizzard nuvo drops on the fireworks and rockets’ stars.
And that’s it! Oh that was fun! Love how it turned out and how bright it is! I hope that you like it and that it has inspired you to create your own! Thanks so much for stopping by, and see you next time.
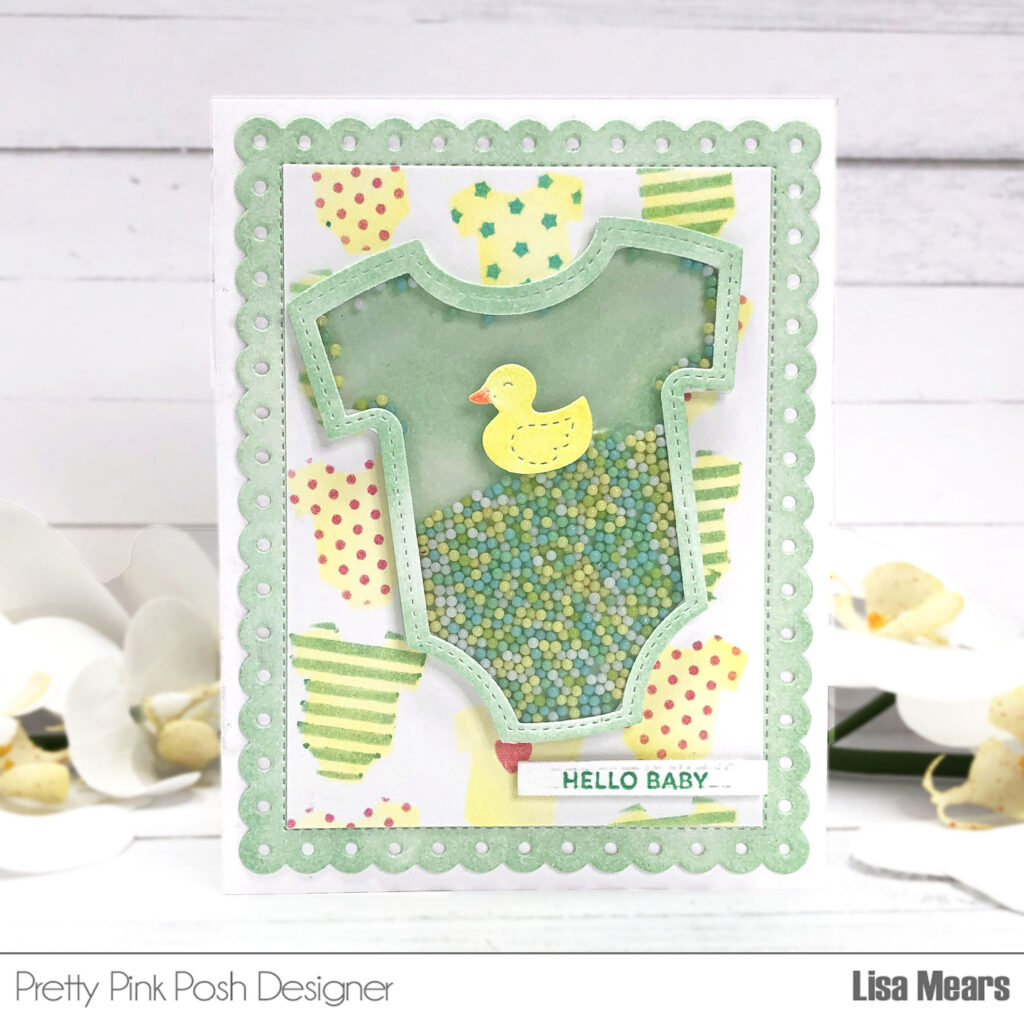
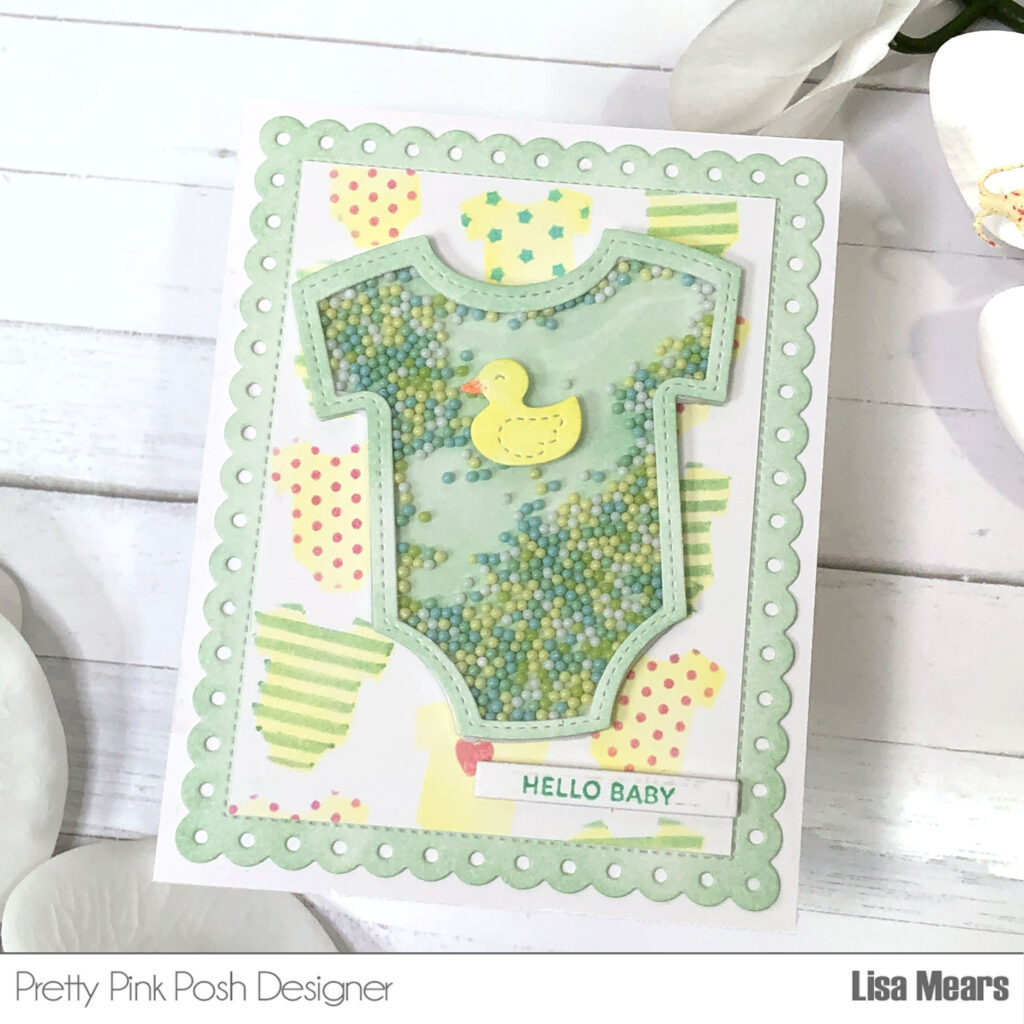
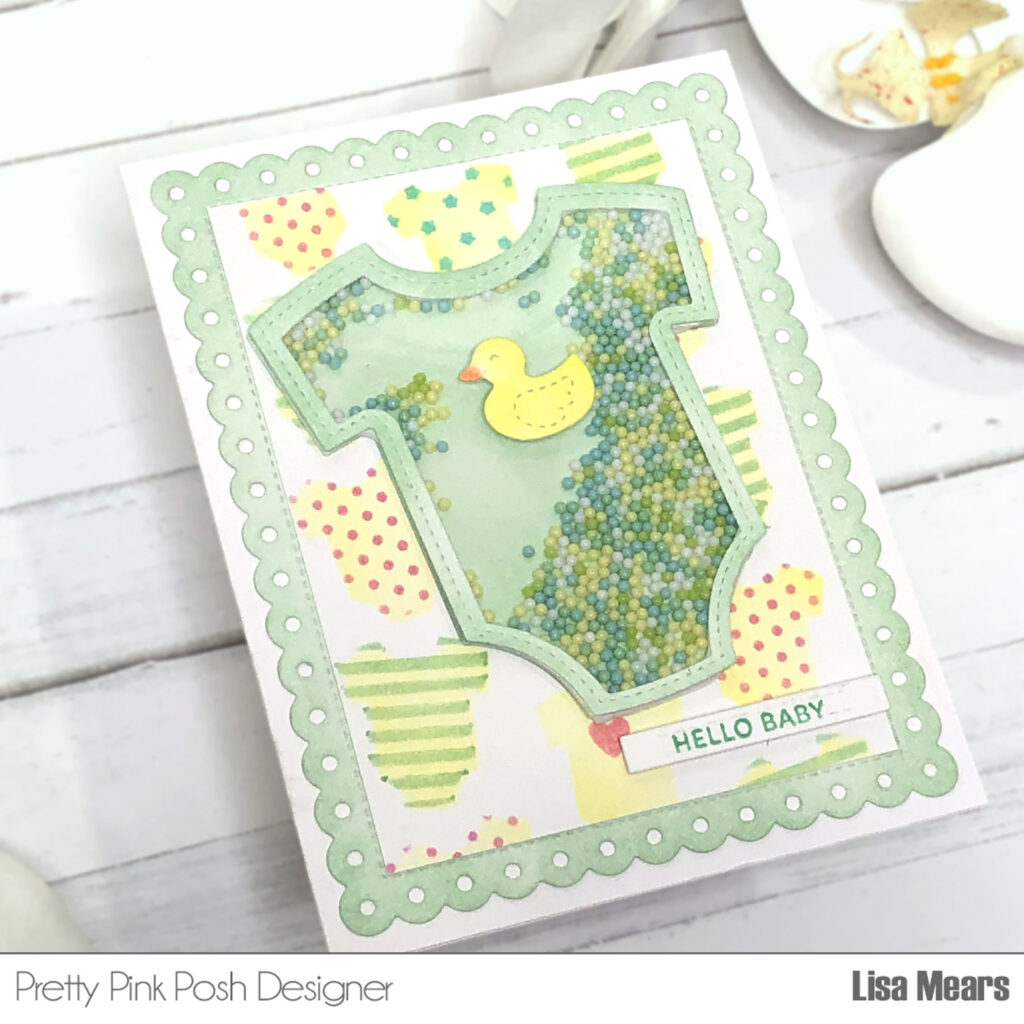
For the background of my card, I used the Layered Onesies Stencils. I inked the stencils with Catherine Pooler inks in the following colors: Chiffon, It’s a Girl, Wintergreen, and Oh Boy.
The focal point of this card is the baby onesie. I used the Onesie Shaker diesto make the onesie into a shaker. This die set can also be used to make a onesie that is not a shaker — it’s simply up to you! Be sure to watch my video to see how I put the shaker together.
I die cut the shapes with white cardstock and inked them up with the same ink colors I used in the Layered Onesies Stencils. I added the new Spring Breeze shaker beadsinside the shaker. I love how the color of the beads match so well with the ink colors I chose.
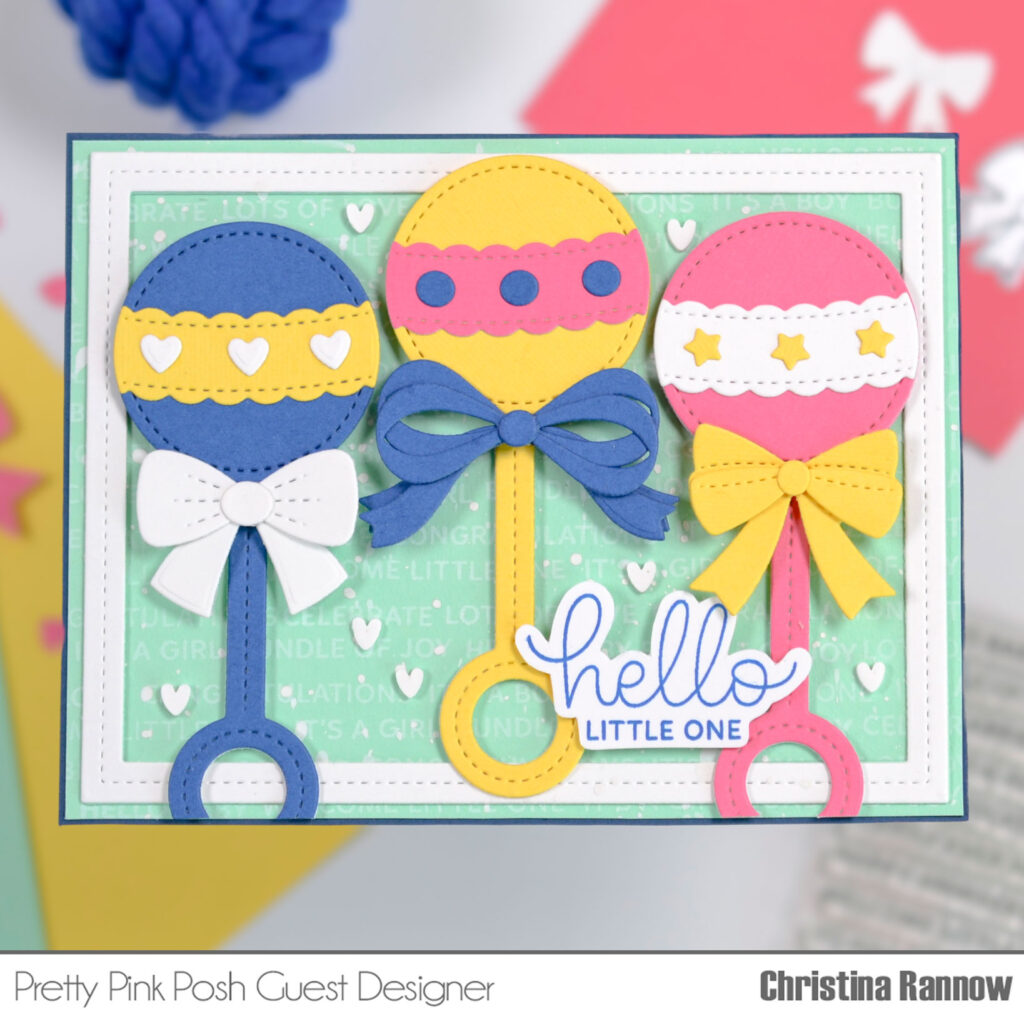
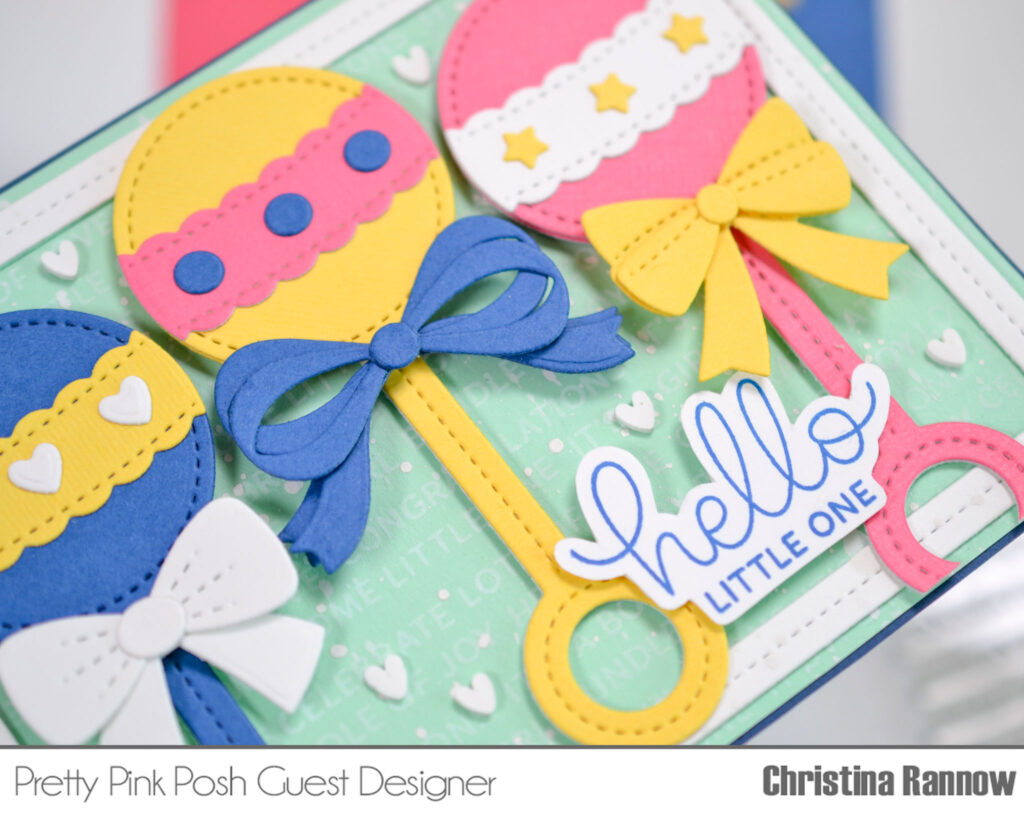
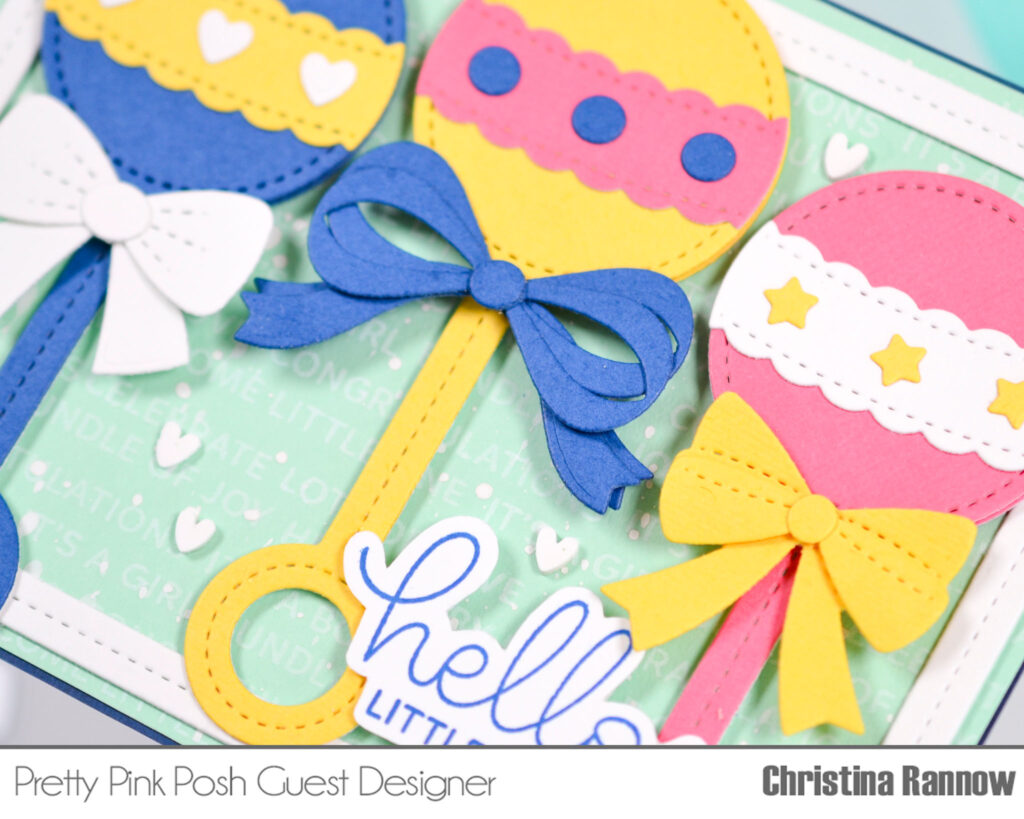
Hi friends! Christina here from My Crafty Trails, and I’m so excited to be sharing my project showcasing some of the cutest products from the newest Pretty Pink Posh release, the Baby Rattle Shaker and Beautiful Bows die sets.
To start my project, I created my own text background by repeatedly stamping small sentiments with white pigment ink on minty green cardstock. Most of the sentiments I used are from the new Sentiment Strips: Occasions Stamp Set, but I pulled a few from the recent Birthday and Valentine stamp sets too. Before adding a stitched white frame from the Nature Essentials Dies to my text background, I splattered it with some white gouache paint.
Next, I die cut all the elements to make three baby rattles from navy, white, yellow, and pink cardstock. I chose not to make my rattles into shakers for this project and just assembled them with the decorative pieces included in the set. I decided to add some of the gorgeous and super-versatile bows from the new Beautiful Bows Die Set. And the dot detail on the yellow rattle is actually a component of one of the bows!
To finish up my card, I attached the assembled rattles to my background and trimmed the handles that overhung the panel. Then, I stamped a sentiment from the new Baby Basics Stamp Setin blue ink and fussy cut around the text before attaching it to my card. Lastly, I added a few white clay hearts and then attached everything to a navy cardstock panel.
PRIZES: be sure to leave comments on each stop. We are giving away 3 $30 gift certificates to three random comments (1 winner each day) left before May 15, 2024 at 11:59 PM PST. I’ll be announcing the winners next week, so be sure to return and see if you are one of the winners.
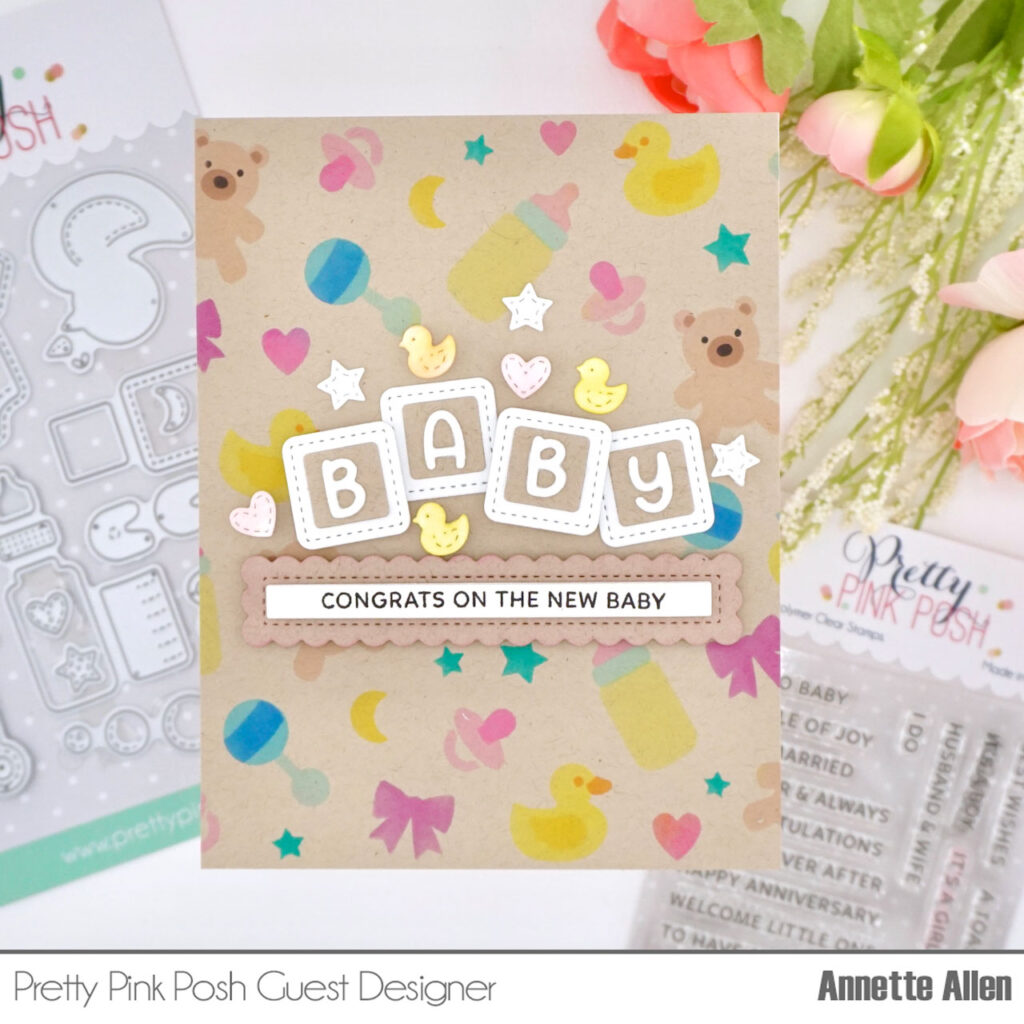
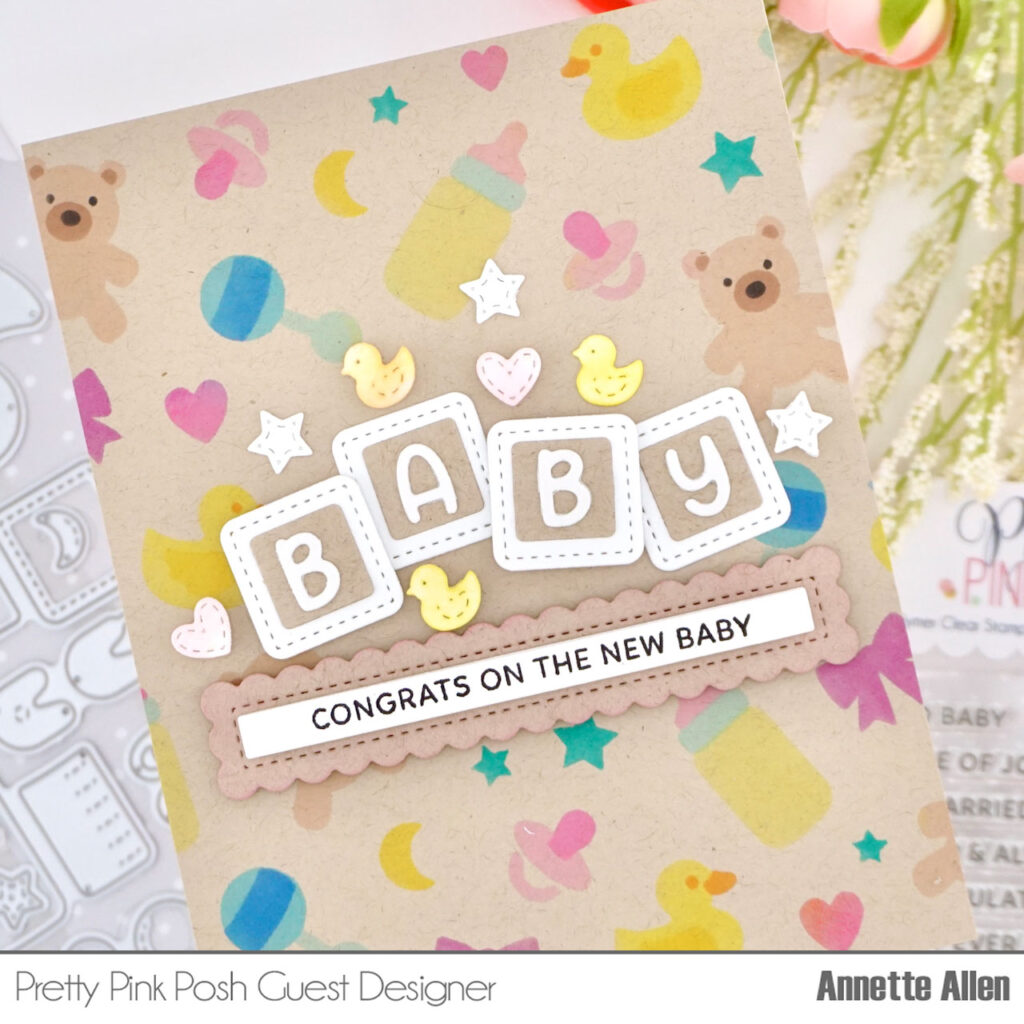
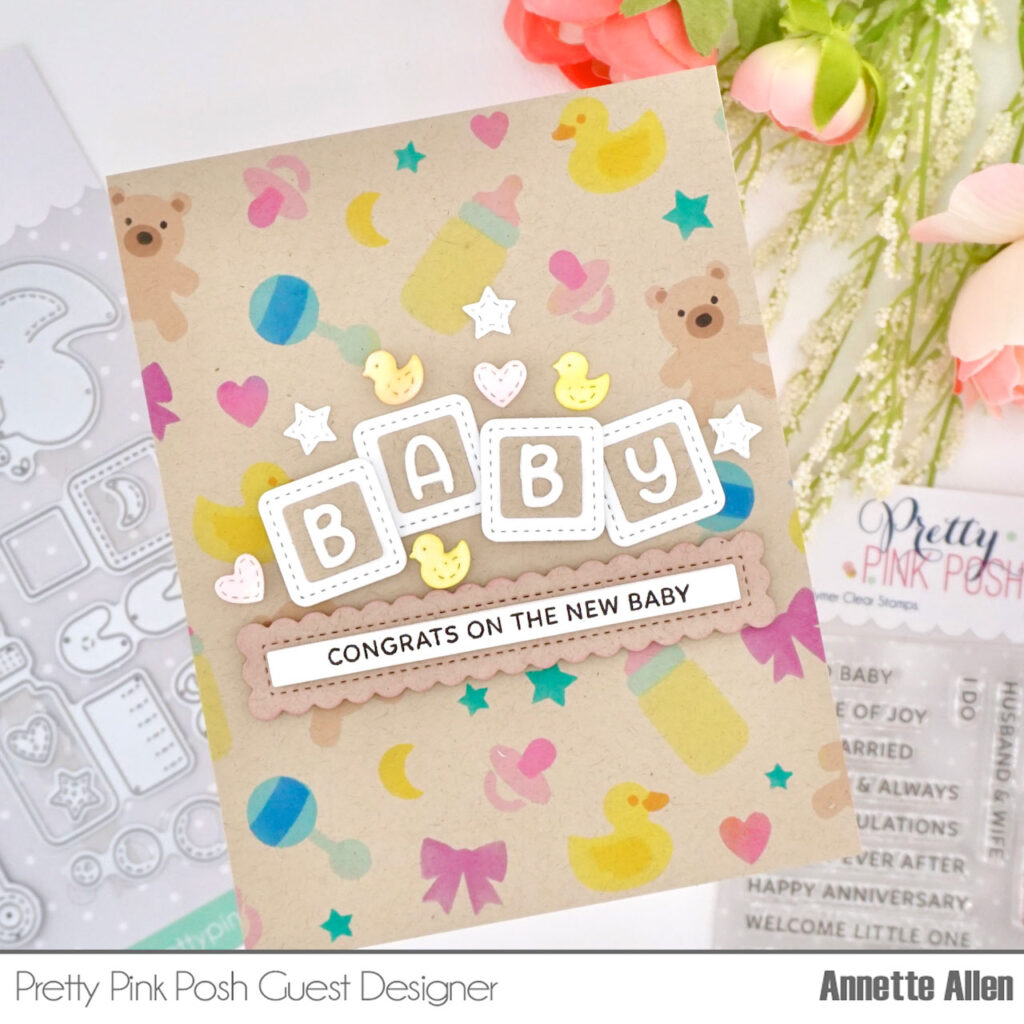
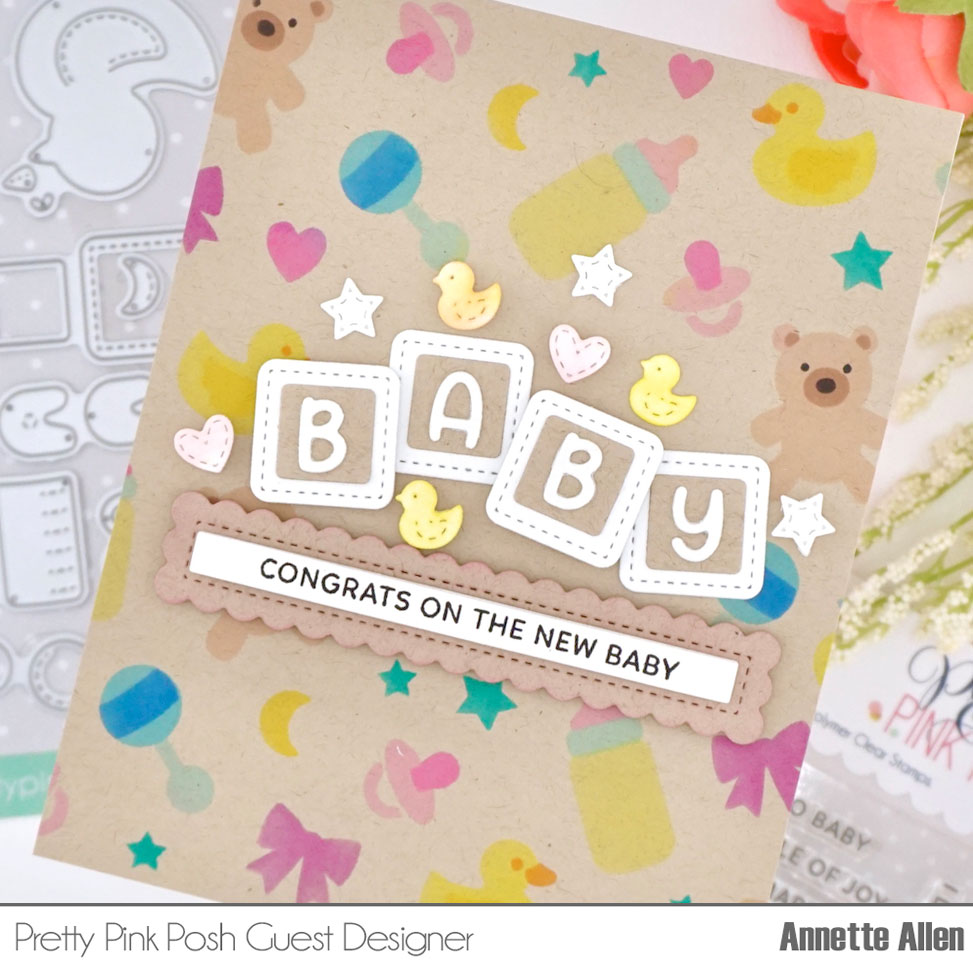
Welcome everyone to day two of the blog hop, Annette Allen here with you today and I am so excited to be guest designing again for this amazing release. I have created a card using the new..
Cut a panel on kraft cardstock A2 size and stencil the new Layered Baby Wreath Stencilson it using colors that you love and well that would be great for a new baby.
Adhere your stenciled panel to your card base using liquid glue.
Die cut all the fun shapes, letters and images from the new Baby Mug Additions die set. You can use colored cardstock or just ink blend some colors on the images.
Die cut the scalloped Sentiment Strips die on kraft cardstock and ink blend lightly a little pink around the edges. Now adhere the sentiment to the center of the scalloped sentiment strip using foam tape. This gives the sentiment a little dimension.
Adhere your sentiment to the your card also using foam tape.
Now let’s build out little baby scene above the sentiment strip. Use liquid glue and foam tape where it is needed. Usually when layering your images using foam tape helps them stand out a little more then just gluing them down all with liquid glue.
PRIZES: be sure to leave comments on each stop. We are giving away 3 $30 gift certificates to three random comments (1 winner each day) left before May 15, 2024 at 11:59 PM PST. I’ll be announcing the winners next week, so be sure to return and see if you are one of the winners.
The May 2024 Release is now available in the Pretty Pink Posh Shop and select retailers that carry our products. If you missed our post yesterday, we revealed all of the products in picture form, but if you would like to see them in a video, Mindy has that for you today!
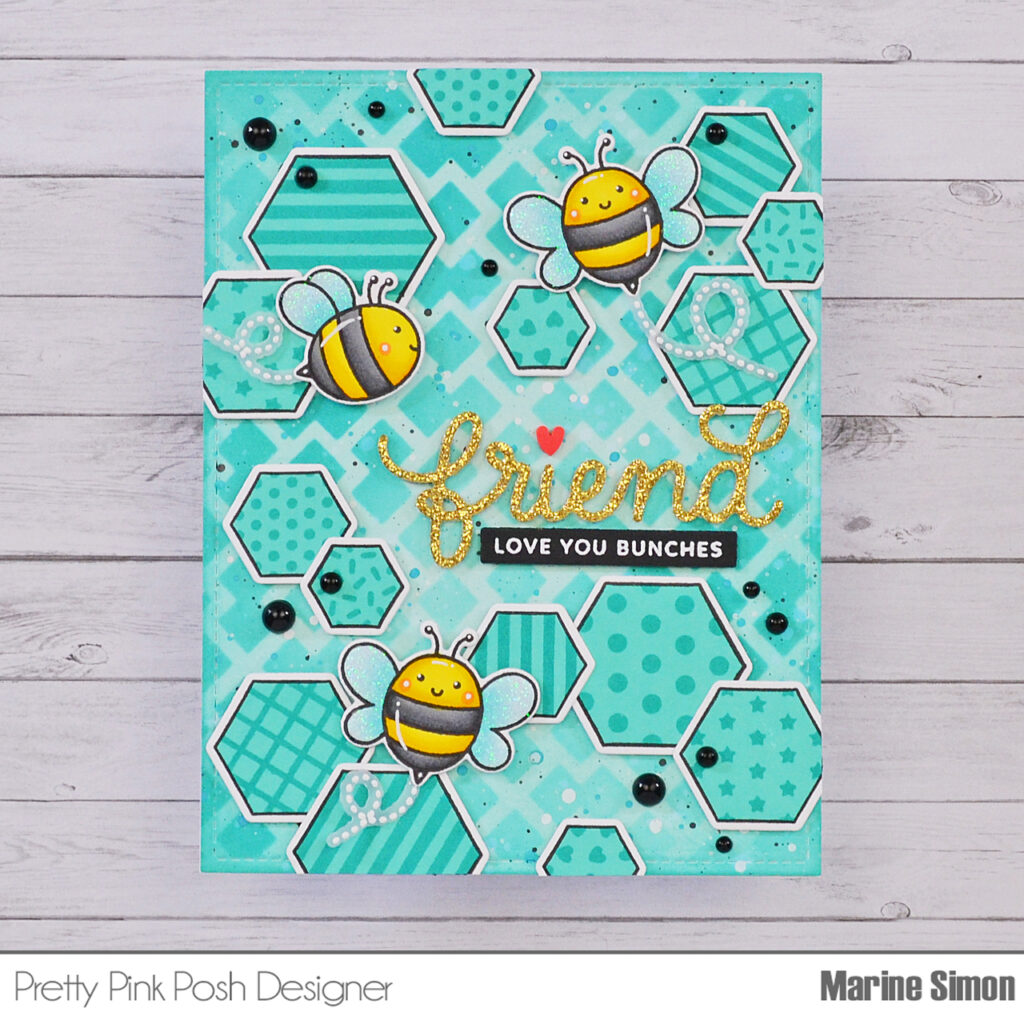
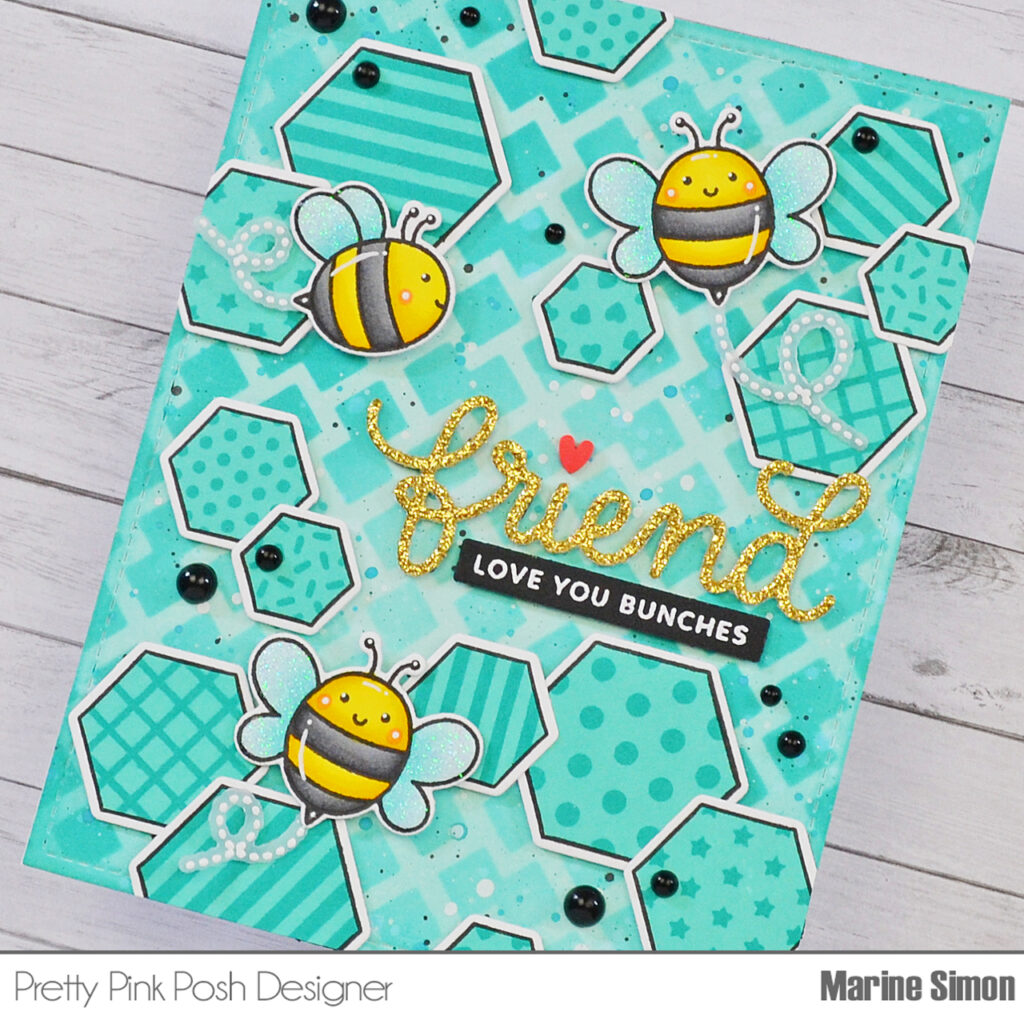
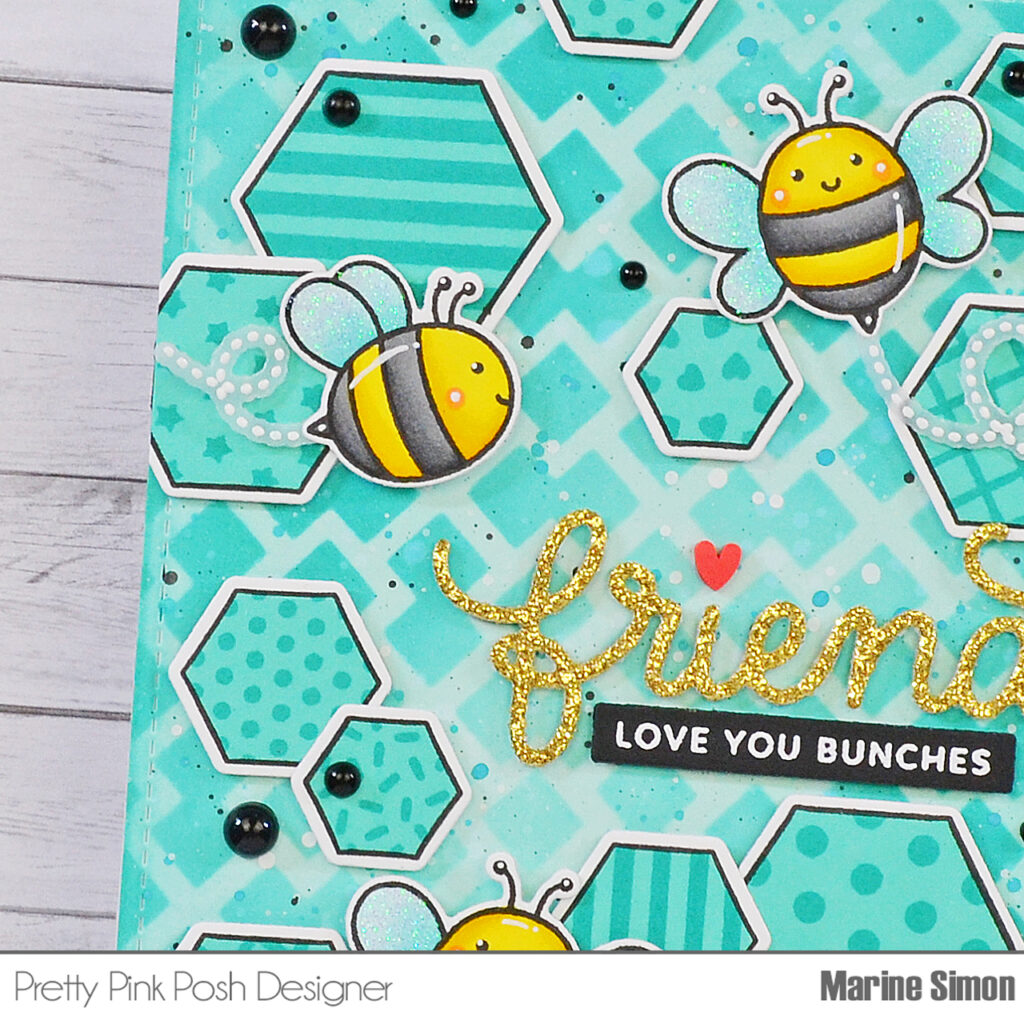
I started off by creating my background on a 5,5 x 4,25 inches Strathmore bristol smooth panel. I first covered the entire panel with salvaged patina oxide ink to get a nice aqua base, and then I used the Fancy Lattice stencil along with peacock feathers oxide ink to create a beautiful pattern on my piece of paper. I also added a little bit of peacock feathers oxide ink on the four edges of my panel, and then added texture. I first splattered water that I dried using a paper towel, next I mixed some peacock feathers oxide with water and used a small brush to add more splatters, and I did the same with black soot oxide ink and with copic opaque white ink.
I set my panel aside to dry, and stamped three Bee Friends on 80lb Neenah solar white cardstock using an alcohol marker friendly black ink. I cut them using the matching dies, and colored them using my alcohol markers. I used a white gel pen to add highlights and details to my three little bees, and applied white blizzard nuvo drops on their wings to make them sparkle. And I also white heat embossed three trails on vellum, cut them using the matching dies, and set those pieces aside for later.
Next I stamped multiple Decorative Hexagons outlines on 80lb Neenah solar white cardstock using the same black ink as the bees, and started off by “coloring” those hexagons using the solid images along with Lawn Fawn Merman dye ink, and I stamped the patterns using Lawn Fawn Peacock dye ink. I cut my hexagons using the matching dies, attached them all on my Fancy Lattice panel using 1mm foam squares, along with the bees and trails, leaving enough space for my greeting.
Speaking of which, I started off by cutting the Friend Shadow word out of gold glitter cardstock. Next I white heat embossed “Love you bunches” from Hedgehog Friends on black cardstock, trimmed it into a slim banner using a Sentiment Strips die, and then attached both pieces on my panel using 1mm foam squares. I finished my card by adding Onyx Black Pearls here and there, as well as a red heart from the Valentine Hearts clay confetti pack right above the “i” in “Friend”.
PRIZES: be sure to leave comments on each stop. We are giving away 3 $30 gift certificates to three random comments (1 winner each day) left before May 15, 2024 at 11:59 PM PST. I’ll be announcing the winners next week, so be sure to return and see if you are one of the winners.
Hello friends! It’s time to reveal all of the products that are part of the May 8th release.
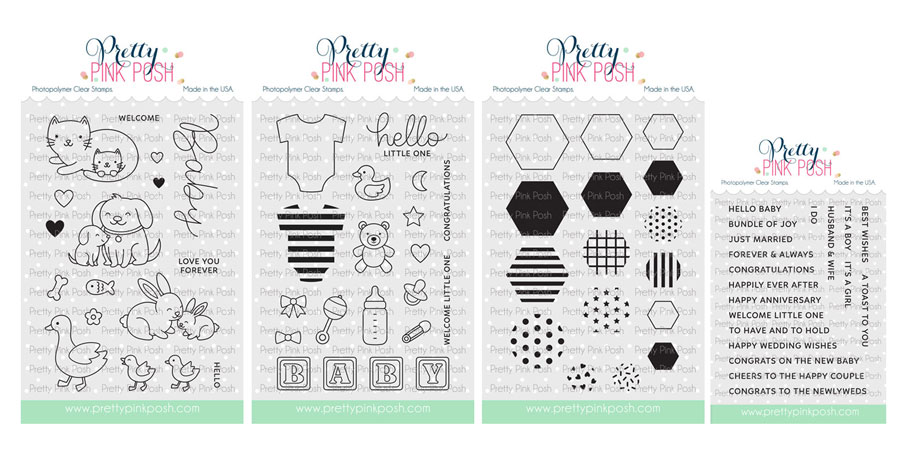
Here’s a look at the four new stamp sets that will be available for purchase: Baby Animals, Baby Basics, Decorative Hexagons, and Sentiment Strips: Occasions.
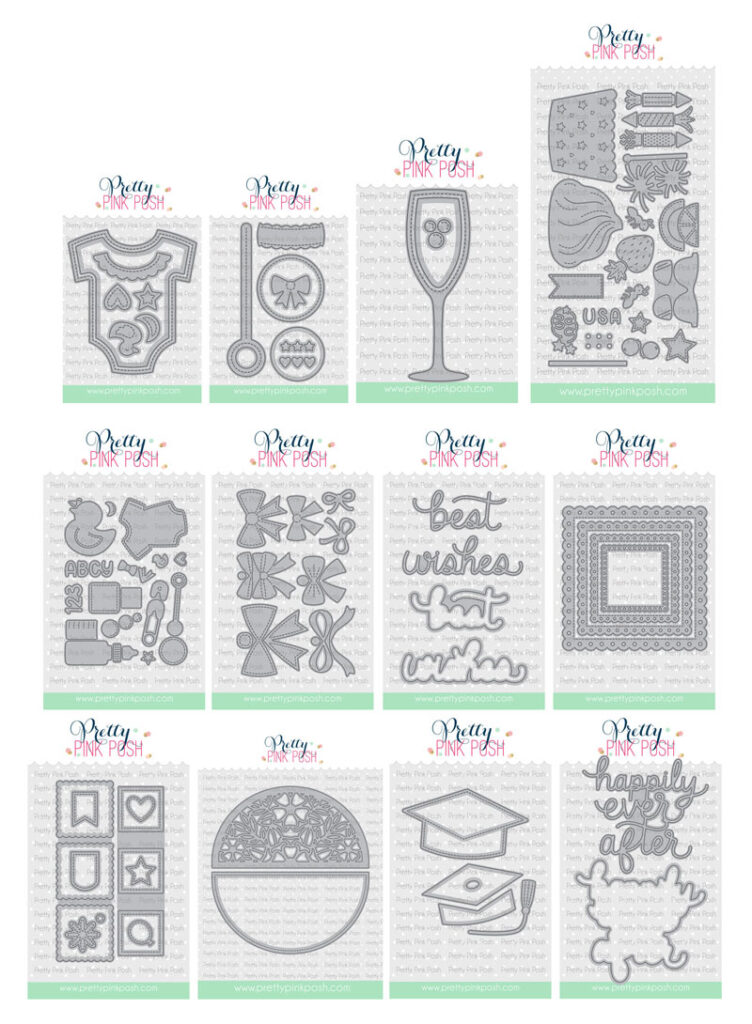
Here are the individual die sets that will be available:Onesie Shaker, Baby Rattle Shaker, Champagne Flute Shaker, Big Celebration Cupcake, Baby Mug Additions(designed to be used with the popular Winter Mug dies), Beautiful Bows, Best Wishes Shadow, Eyelet Squares, Stacked Squares, Floral Semicircle, Graduation Cap Shaker, and Happily Ever After Shadow.
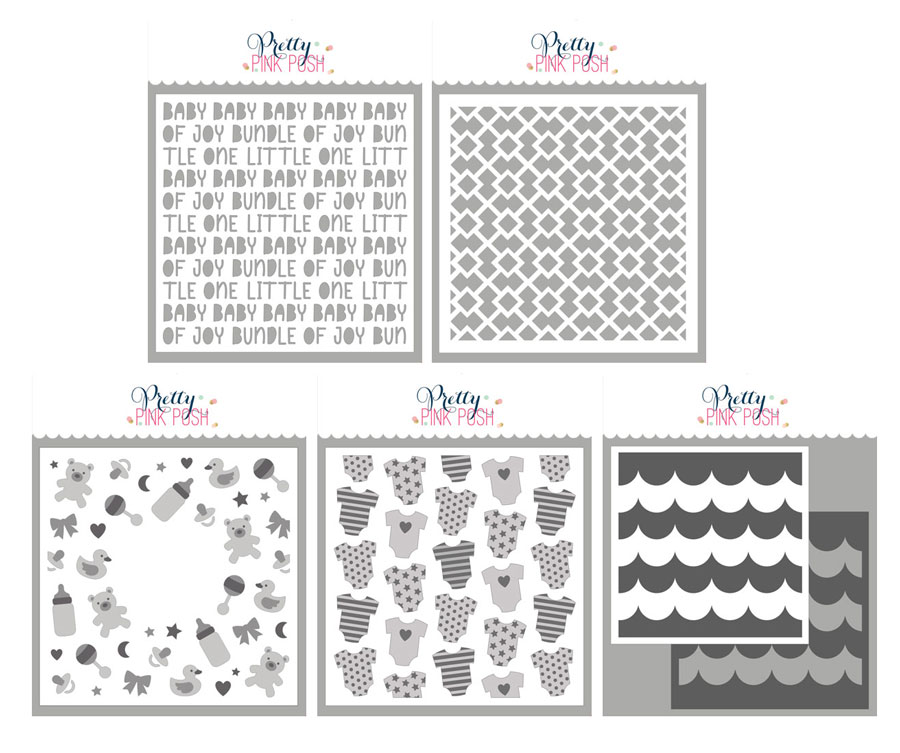
This month we have five new stencils: Baby Words, Fancy Lattice, Layered Baby Wreath (3 layer), Layered Onesies (2 layer) and Stacked Scallops (2 layer).
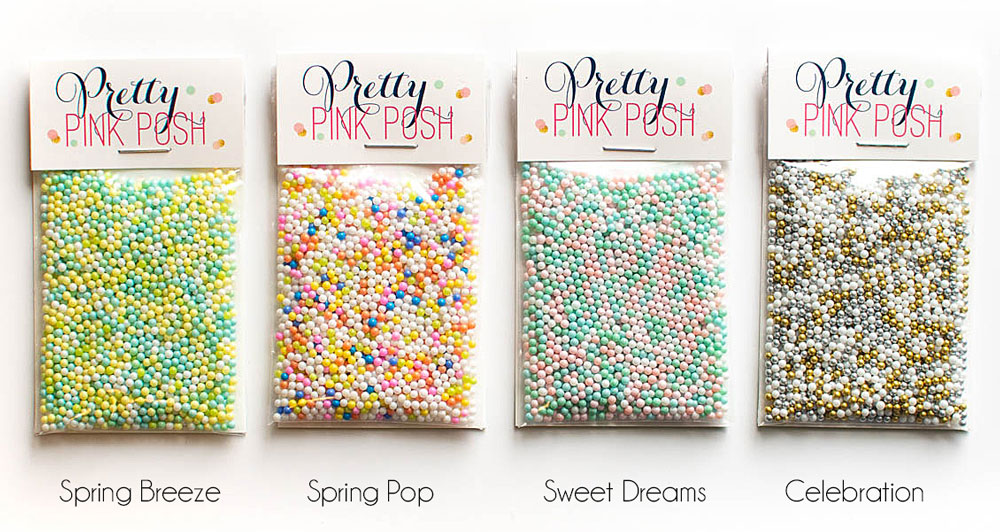
There are four new shaker beads in this release: Celebration, Spring Breeze, Spring Pop and Sweet Dreams.
We have a limited amount of bundles available where you can buy this release in one easy click. Plus, you’ll save 15% off when you buy it all together.
We will see you tomorrow as we show you the new products in a video and the products go live individually. Plus, we’ll kick off our three day blog hop!
Good morning! It’s Lindsey here, and I am excited to give you a peek of the fun mix of dies releasing this month. There are some awesome basics to add to your stash as well as a bunch of new dies to help you celebrate oodles of happy occasions – graduation, wedding, baby, and more! You’re gonna love them!
New release will be available May 8th
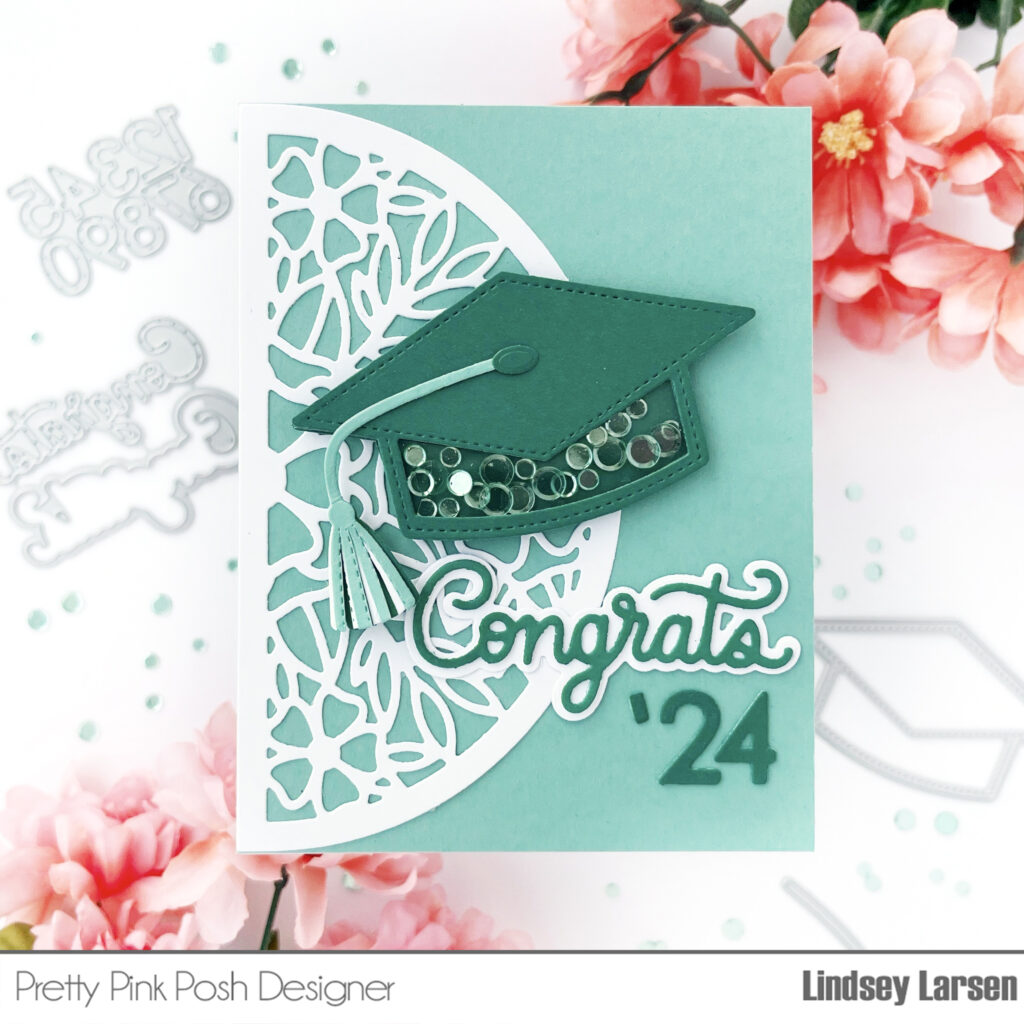
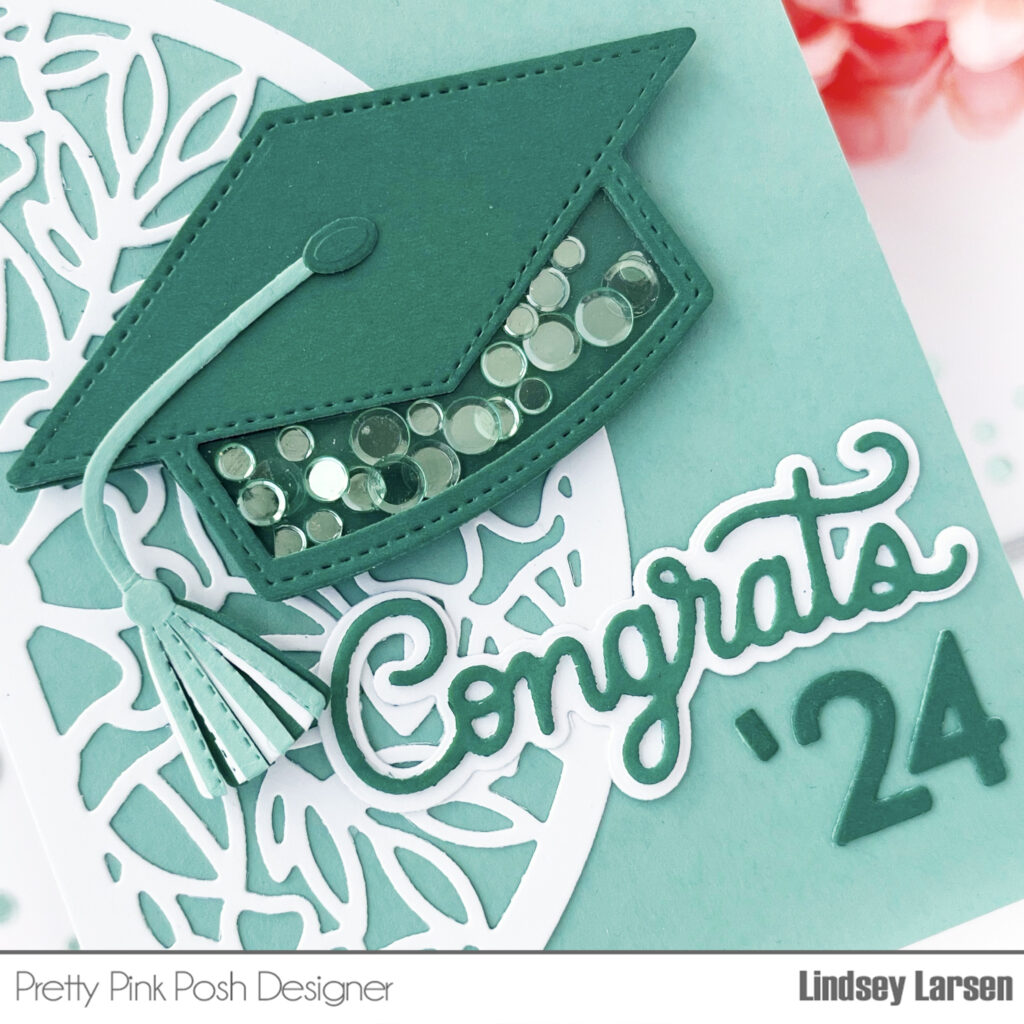
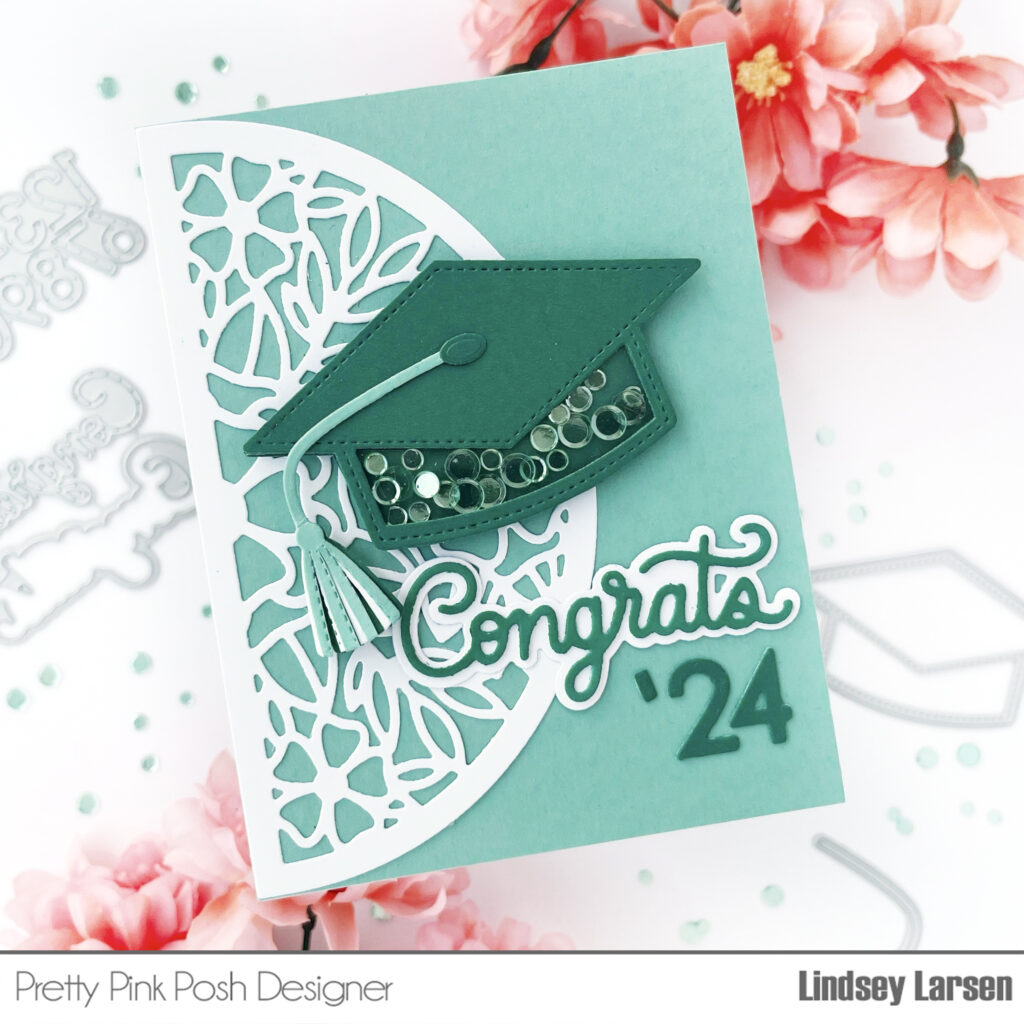
Since graduation season is upon us, I immediately pulled out the fun Graduation Cap Shaker Die. This die gives you options to add a shaker element to the top of the cap, the bottom of the cap, both, or no shaker element at all. You choose. :)
On my card I decided to fill the bottom of the Graduation Cap Shaker withMint Shimmer Confetti Mix. I jazzed up the tassel a bit by trimming along the stitched lines and layering three colors of cardstock.
I considered adding some florals to the top of the graduation cap because I think the personalized graduation caps are so fun, but I opted to use the beautiful new Floral Semicircle Die to add florals to my card base instead.
I finished the card with the Congrats Shadow Die and some numbers cut with the previously released Graduation Mug Additions Dies. This simple design makes it really easy to customize colors for your graduate. And if you want to go a little more masculine, you can always swap out the florals with the solid, stitched semicircle die in the Floral Semicircle die set.
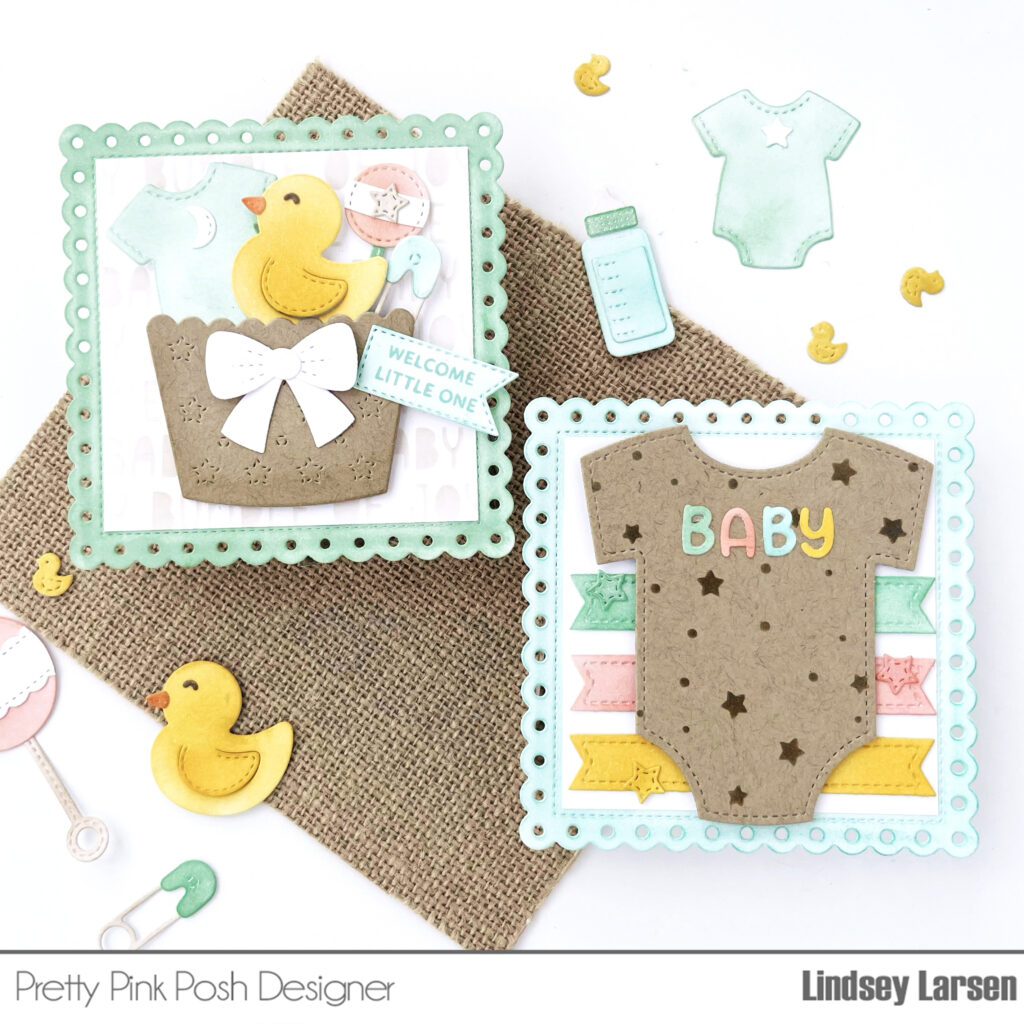
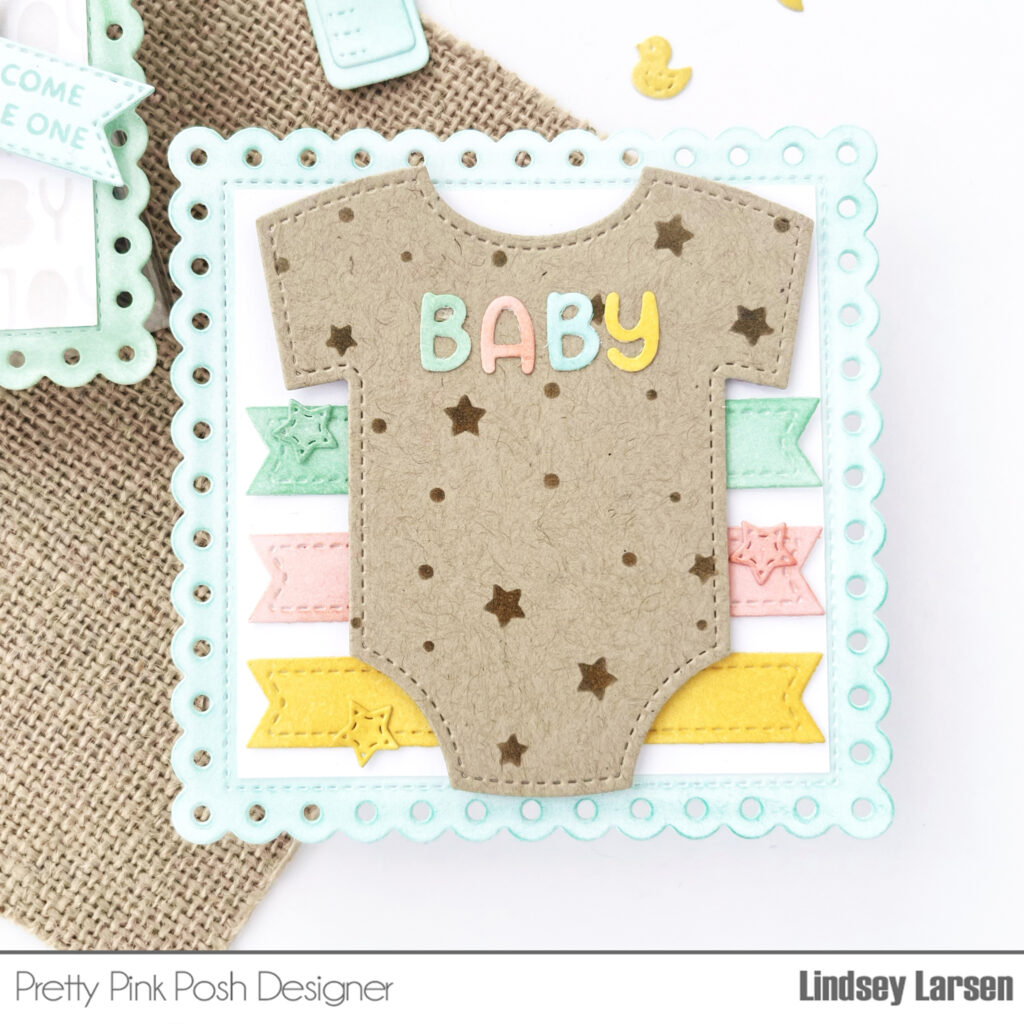
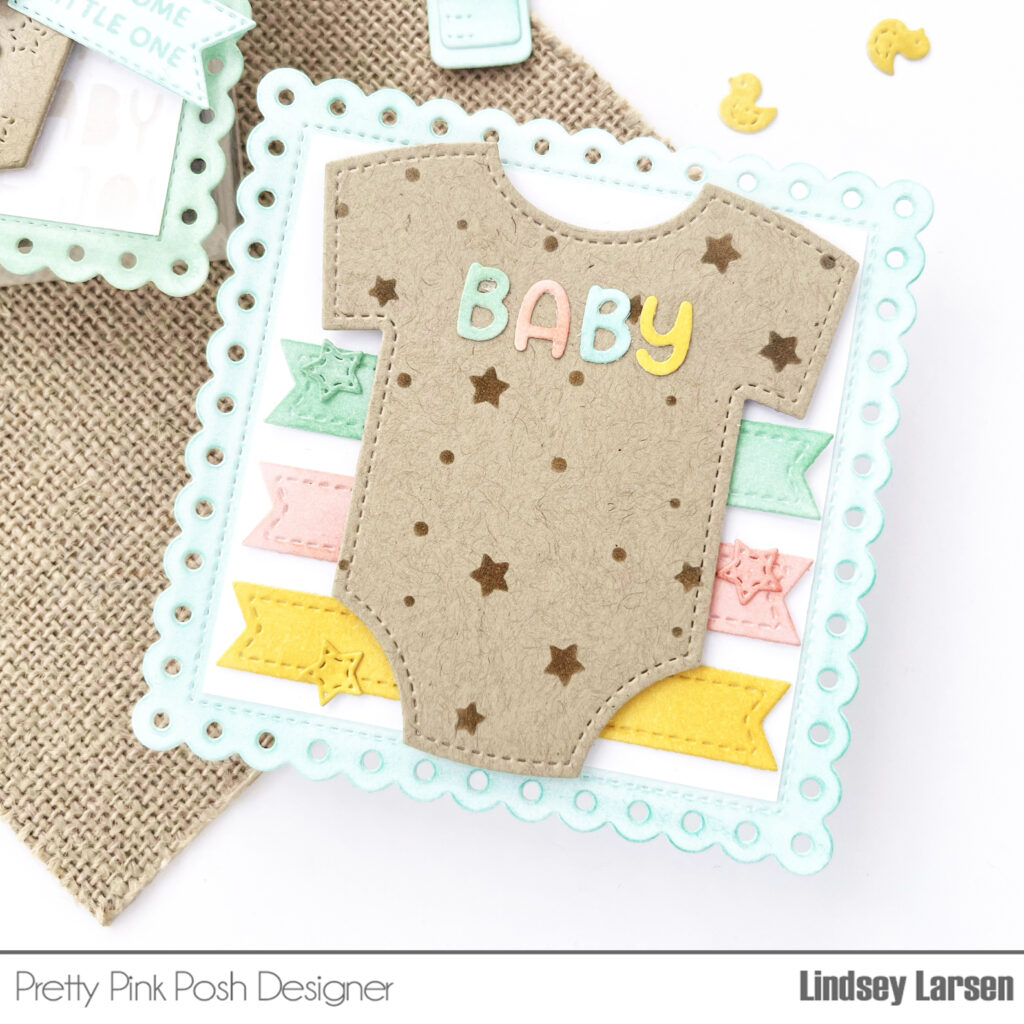
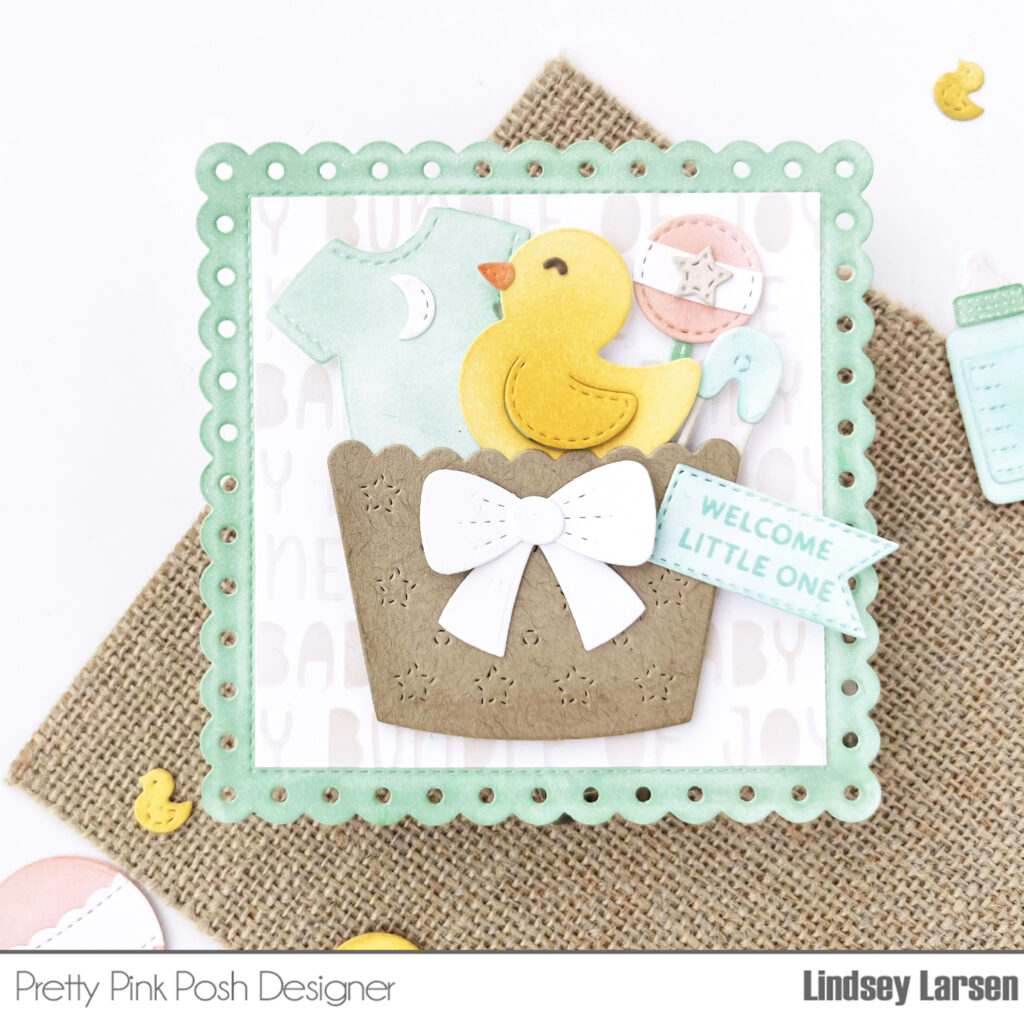
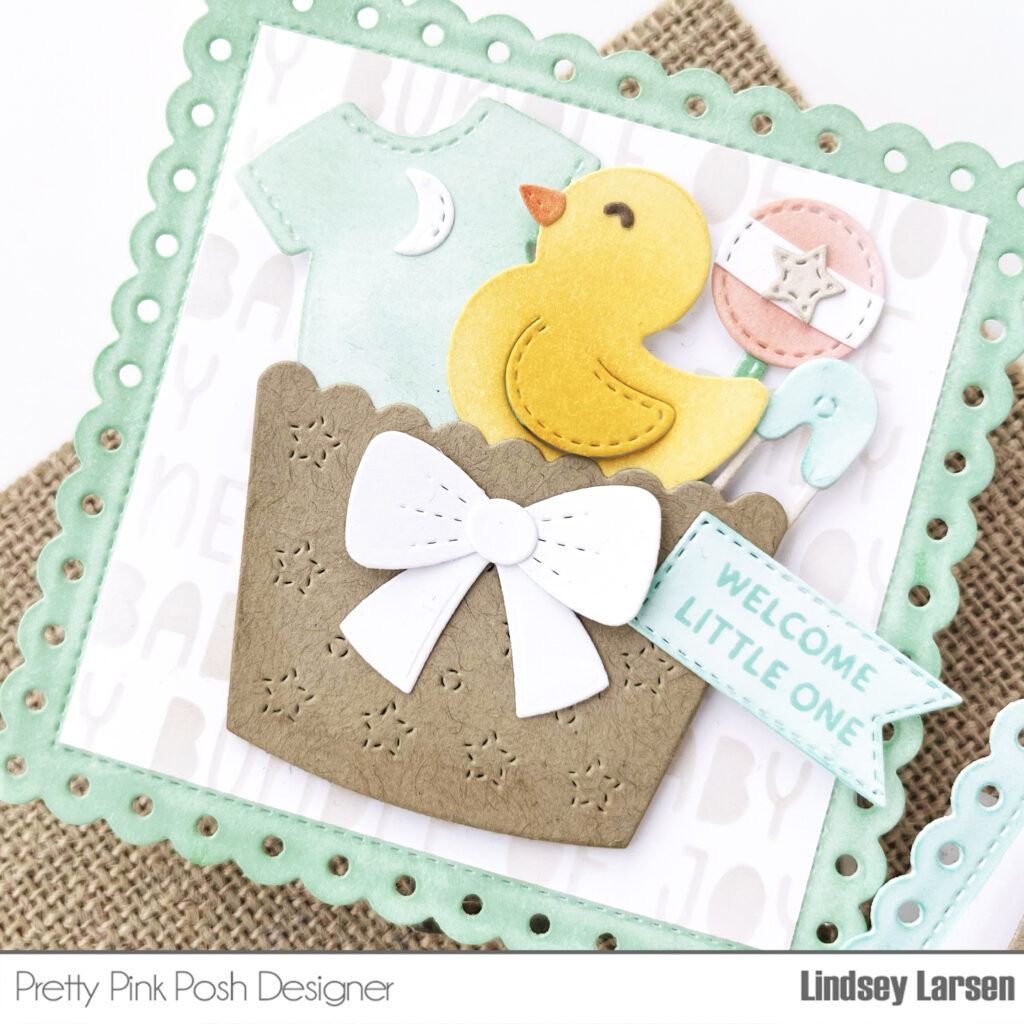
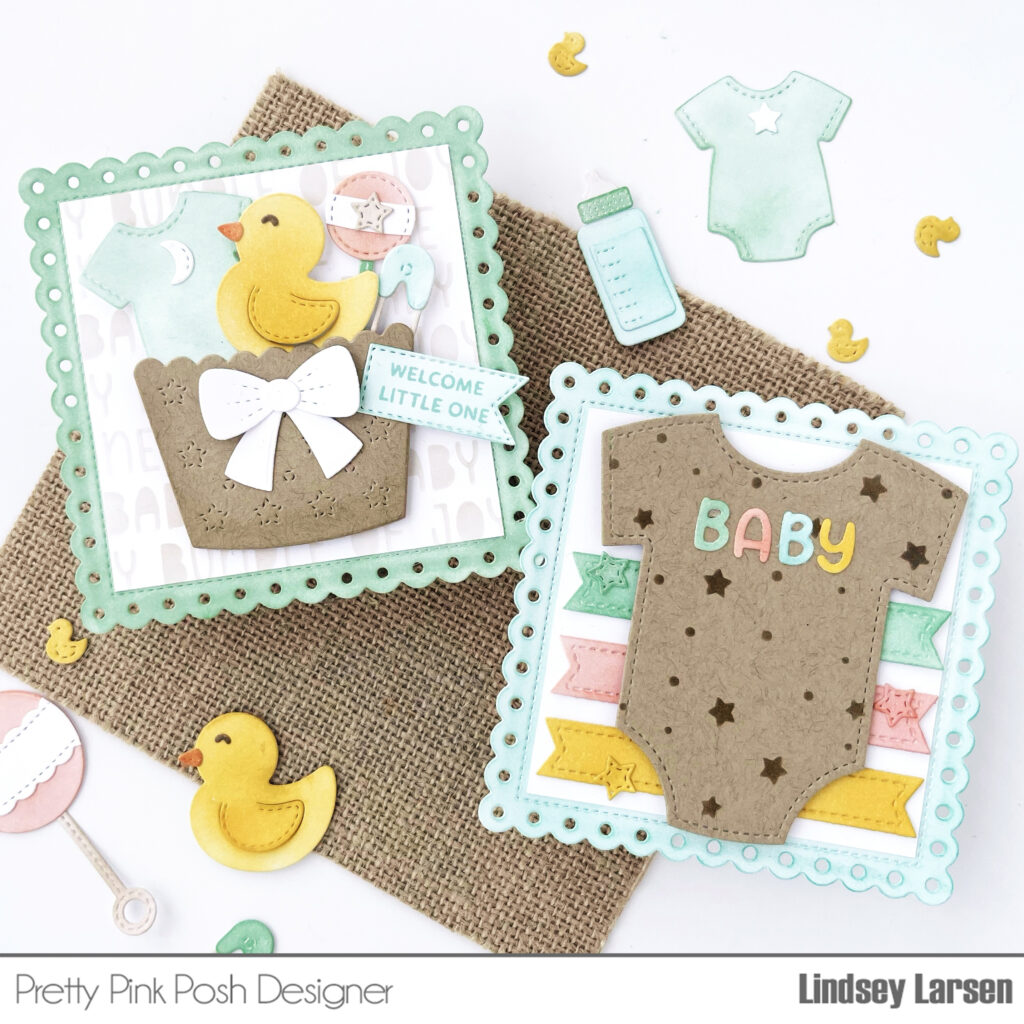
The baby themed products this release are absolutely darling! I have six friends having babies in the next couple months, so I have lots of baby cards to make. I made this set of cards using the largest of the new Eyelet Squares dies.
On the first card, I added the darling new Onesie Shaker Die. After cutting it, I stenciled on the Starry Background Stencil and added “baby” using the new Baby Mug Additions Dies.
Then I used the Sentiment Strips Diesto repeat the colors on the background. Finally I added a few stitched stars found in the Baby Mug Additions.
While I had the Baby Mug Additions out, I die cut a bunch of the other shapes and blended ink on them for my second card. These super cute baby items were designed to be great mug fillers, but I wanted to show another option. I turned the wrapper in the new Big Celebration Cupcake into a little basket.
I added a bow from the new Beautiful Bows Dies(so many fabulous sizes and styles in that set!) and a little flag using a sentiment from the Baby Basics stamp set. You’ll also see a peek of the Baby Words Stencil on the background.
Thanks so much for joining me today! I feel like I only scratched the surface of the new dies releasing this month. Be sure you come back tomorrow to see a full look at what’s coming on May 8th!